How to Practice the Saxophone: Four Key Principles That Can Help You Advance

What does it take to develop as a jazz saxophonist–or, for that matter, as any kind of instrumentalist?

Practice.

Right, I guess we all know that. But there is practice, and then there is effective practice. Practice that makes the best use of the time you’re investing. Practice which a year from now will have produced a year’s worth of results rather than a month’s worth of plodding the treadmill twelve times over.

Two things are paramount for effective saxophone woodshedding: what you practice and how you practice. In previous posts and on my jazz page, I’ve provided plenty of material that addresses the “what” part of that equation. In this article, I’m going to talk a bit about the “how” as it pertains to technical development.

Having spent time contemplating the things that have contributed to my own growth as a sax player, I’ve identified four key principles that I believe are important for developing technical proficiency. They are:

Isolate

Repeat

Connect

Memorize

These four principles work together to help you transition from the initial, heavily intellectual process that comes as you tackle new musical material, to a more intuitive approach that develops as you spend time mastering that material and making it your own.

Each of the principles could easily be an article in itself, so I’m not going to tackle them in depth. Right now, I just want to introduce you to the concepts.

Isolate

Whether you’re learning a new scale, practicing patterns, hashing out a lick, moving around the circle of fifths, or memorizing a Charlie Parker solo, the way to approach musical material is in increments.

Think of how you eat your food. You’d never stick an entire steak in your mouth and try to swallow it whole. (You wouldn’t, would you?) No, you cut off manageable, bite-size pieces which you take your time to chew. The same idea applies to working on music: bite-size is best.

Pick groups of notes and repeat them till they lay well under your fingers. In particular, isolate problem areas and focus on them, oiling them with repetition until they’re working smoothly. Work out which alternate fingerings work best in a given situation. If you’re playing in the key of F#, for example, you may find yourself using the bis, one-four, and side fingerings for A# almost consecutively as the context for your approach to the note A# changes.

START SLOW. Concentrate on how evenly you connect the notes, not how fast you can play them. Once you’re playing a note group accurately, comfortably, and consistently, then speed up a notch or two, and continue to increase your speed till you’re playing at high velocity. If you find yourself hitting a speed where you start fumbling and misfiring, then slow down. The point isn’t to play fast, but to play masterfully. Fast will follow.

Repeat

Repetition is woven into the first principle of isolation. You isolate a group of notes or even just two notes in order to repeat, repeat, repeat them, often enough to drill them into your muscle memory. Since I’ve already written a post on repetition, there’s no need for me to–ahem–repeat what I’ve already said. Go read the article.

Connect

Once you’re playing a group of notes fluently, add a note or two in front of it or behind it. Or work on the next group of notes until you’re playing it as fluently as you were playing the first, then connect the two groups.

In the process of focusing on the second group, you may find that you’ve lost a bit of ground with the first group. That’s okay. Go back to the first group and smooth it out. The point is, you work on small units of material, then you work on connecting them to create something larger–to which you will, in turn, connect still more material.

Often you’ll encounter a sticking point between the last note or two in one note group and the first couple of notes in the group that follows. That juncture should become a new area to isolate and work out.

If this sounds like a tedious process, it can be, but it’s also a very profitable one. And not all groups of notes carry equal weight. Some come more easily; others are more challenging. Run toward the challenges, not from them.

Memorize

As long as you’re depending on the paper to tell you what to play, the music you’re working on isn’t really yours. I’m not referring to extended pieces of music where a chart is mandatory, but to scales, licks, patterns…to the building blocks of technique and the language of jazz improvisation. Memorization is an indispensable part of the jazz saxophonist’s toolkit.

The whole point of all this isolating, repeating, and connecting is to move the music off the printed page and into your head and your fingers. So at the very beginning of the process, make a point of looking away from the sheet music. Consult it as freely as you need to, but remember that your goal is to wean yourself from it. When you’re in mid-flight on the bridge to “Cherokee” on your alto sax, you had better be thoroughly acquainted with the keys of Ab, F#, E, and D, because the rhythm section is not going to pause while you look them up in your Larry Teal workbook.

Memorize everything. Tunes. Chord changes. Scales, arpeggios, circular root movements…everything you can possibly cram into your gray matter and drill by repetition into your muscle memory.

One last thing…

Think about what you’re doing. Engage your mind in the process. If you’re working on a digital pattern, consider not just what you’re playing, but also how you can use it with various chords or chord progressions. Think about how you might switch up the rhythm of a lick to create a different effect. You can build all the saxophone technique you want to, but ultimately it’s your brain, not your horn, that converts the raw material into actual music.

That’s it for today. If you enjoyed this post and would like to read more helpful articles on playing the sax, or perhaps find a jazz sax solo transcription to hash out, see my jazz page.

Practice hard–and have fun!

How to Master Circular Breathing on the Saxophone

It has been so many years since I first learned how to circular breathe that I rarely give the matter a thought anymore. It occurs to me, though, that to many sax players, circular breathing remains a technique shrouded in mystery.

There is, after all, something about it that appears almost miraculous. Most saxophonists would be challenged to hold a tone for thirty seconds. So how on earth did saxophonist Vann Burchfield manage to sustain a single note for 47 minutes, 6 seconds, in 2003, beating the previous record set by Kenny G of 45 minutes, 47 seconds? (An even more interesting question is, why did he do it? But the point of this article is to discuss the mechanics behind such a feat, not the psychology.)

Sensationalism aside, circular breathing is a useful technique with practical benefits for those who add it to their tool kit. But how does one go about doing so?

Begin by understanding the basics of how circular breathing works.

The principle is fairly simple (which is not to say, easy to master). You support your tone with air from your lungs in the usual way. However, when your air supply begins to dwindle, you store a quick reservoir of air in your cheeks. Then, closing off the back of your throat, you sustain your tone by contracting your cheeks while simultaneously–and very quickly–replenishing your lungs with air by breathing in through your nose.

This accomplished, you reopen the back of your throat and once again blow from your lungs. Repeat the procedure as often as necessary.

It sounds tricky, and it is at first, but the essentials really aren’t any great secret. Like any discipline, though, circular breathing takes time and persistence to master. Once you’ve got the hang of it, you’ll find that you’re able to continue playing indefinitely, spinning out lines for as long as you please without having to break the flow.

Here’s a simple, step-by-step process to get you started.

1. Get in touch with your air reservoir. How do you do this? Simple: take a breath and then puff out your cheeks. Now continue to puff out your cheeks while breathing in and out through your nose. Note how the back of your throat automatically closes in order for you to accomplish this, sealing off a reservoir of air in your mouth that keeps your cheeks “inflated” while your lungs continue their normal breathing rhythm.

2. Repeat the above procedure. But this time, blow a controlled stream of air through your lips, allowing the reservoir of air in your cheeks to empty itself like a leaky balloon. When you start losing pressure in your cheeks, then–without interrupting the air flow through your lips–breathe in through your nose and then release the air from your lungs into your mouth, replenishing the reservoir of air. Then close off your throat again. Continue doing this till it seems easy (which will probably happen fairly quickly because it is easy, much easier to do than it is to describe!).

The objective is to maintain a steady air stream through your lips while opening and closing your throat to replenish your air reservoir.

3. Till this point, the focus has been on getting a feel for the air reservoir in your mouth/cheeks. The reservoir is key, but in circular breathing, you’ll only use it for the second it takes to fill your lungs with air, after which your throat remains open and you blow in the normal fashion.

So in this exercise, blow a steady stream of air through your lips, allowing the pressure to puff out your cheeks, but support the air stream from your lungs. Keep it going for five or ten seconds, until your lungs begin to empty. Then close off your throat and keep the air stream moving by using the air in your mouth reservoir, as in exercise number two. Simultaneously, inhaling through your nostrils, fill your lungs back up with air. Then open your throat back up and blow from your lungs once again.

4. Once you can comfortably and consistently perform the above exercise, you’ll have gotten your arms around the essentials of circular breathing. At this point, you are in fact performing the technique. Now it’s just a matter of transferring it to your instrument.

When I was first learning to circular breathe, I found it helpful to work with the soprano saxophone. Assuming a conservative reed/mouthpiece combination, the soprano uses less air than the larger horns, making the learning curve easier. If you’ve got a soprano sax, I highly recommend that you practice circular breathing on it before you try it on your alto or tenor.

Start by seeing how long you can sustain a single tone in the middle register of your instrument. The note C on the staff works great. Avoid extremely high and low notes for the time being. Concentrate on making a smooth transition between lung support and reservoir support, striving for minimal pitch wavering, change in volume, and certainly break in tone when closing and reopening the back of your throat.

From here on, gaining proficiency is just a matter of focused, self-analytical practice. However, there are…

A few things to be aware of.

These involve the way you use your mouth reservoir to sustain a tone.

In the above exercises, you’ve had your cheeks puffed out and allowed the air to leak out of them in a controlled stream. Once you start blowing through a mouthpiece, you’ll find that things aren’t quite so easy. The air goes at a faster rate, and you need to contract your cheeks like a bellows in order to provide enough air pressure to sustain a tone on the horn.

Ultimately, of course, you want to dispense with puffing out your cheeks as much as possible. Cheek-puffing is handy as a preliminary learning device, but it’s ruinous on intonation and good breath support. As you spend time refining your circular breathing technique, you’ll find that you can exert air pressure from the back of your throat by lifting your tongue forward. I don’t know how better to describe what I’m getting at, but I’m quite certain that you’ll discover it for yourself if you continue to practice circular breathing.

Once you’re able to sustain a single tone with reasonable control, try playing a scale using circular breathing. From there, try a favorite lick. Circular breathing while playing lines is challenging at first, but once you’ve acquired the ability, you’ll find that moving notes are actually more forgiving than long tones. They tend to mask the unwelcome waver that often attends the shift in air support.

And that, my friends, is that. My job is done. Yours is just beginning. Grab your horn and get started.

Finding Jazz in the World Around Us

My sweet lady, Lisa, and I took a trip to Meijer Gardens earlier this week. Today, sifting through the photos I took as our tram ride wound along the curvy path through the world-class outdoor sculpture garden, and afterward as we strolled through the remarkable plantings in the children’s garden, I’m struck–as I often am–at how the elements of music are woven into the very fabric of our world.

Jazz is all around us. Form, space, unity, diversity, rhythm, dynamics, improvisation, color, texture, contrast, creativity–whether in music, nature, speech, literature, art, human relationships, or above all, our relationship with God, you’ll find the same qualities working together to create beauty and interest.

Consider the qualities of space and contrast. In a jazz solo, the notes you don’t play are as important as the ones you do. Too much clutter, too many notes in endless procession, ceases to communicate. As in writing and conversation, well-placed punctuation–held notes, brief pauses, and longer rests–helps to shape musical ideas and gives them breathing room. Yet the furious density of artfully placed double-time passages creates another form of color. Both space and density can be overdone; it’s the contrast between the two that helps raise a solo from the doldrums to vitality.

The massive red iron piece titled “Aria” is a great visual representation of the interrelationship between music and art. The piece has a rhythm to it, shape, space, contrast–all the aspects of a well-crafted jazz improvisation.

Aria: like a jazz solo cast in metal.

Aria: like a jazz solo cast in metal.

Here are a few more images from the sculpture garden and children’s garden that remind me of music and jazz.

What musical elements can you detect? Space? Sequence? Color? Dynamics?

What musical elements can you detect? Space? Sequence? Color? Dynamics?

This landscape sculpture creates unity out of contrast and serenity out of movement.

This landscape sculpture creates unity out of contrast and serenity out of movement.

If only I could play a solo as creative, spontaneous, and cohesive as this!

If only I could play a solo as creative, spontaneous, and cohesive as this!

Lisa: the beautiful song God has brought to my life!

Lisa: the beautiful song God has brought to my life!

The Loudest Sax Player Ever

My friend and fellow musician Dave DeVos once told me, “You are the loudest sax player I’ve ever known.”

His words weren’t a compliment, just a statement of fact tinged with a slight mix of incredulity and annoyance. I’m a very loud sax player, much louder than I realize. As the old cliche says, I don’t know my own strength.

Of course I can play softly, but soft is not my default mode. Part of that is attributable to my horn, which is an old Conn 6M “Ladyface” that is very good at translating the air I move through it into immense volume levels. Another part is due to my mouthpiece, a Jody Jazz classic #8. But I think the main reason I’m a loud player is directly linked to the guy behind the horn. I just seem to have a knack for massive sound output.

I wasn’t always a loud player. I entered my freshman year in college a quiet young saxophonist. My sound at the time was styled after Tom Strang, a local alto man who owned a jazz bar in Ada called the Foxhead Inn. Tom had a smooth, mellow sound, very pleasing to the ears. He was not a loud sax player.

As an early influence, Tom’s tone pointed me toward a somewhat Desmondesque approach, not exactly the kind of robust Cannonball sound that could melt the wax in a listener’s ears at 100 feet. It was more a kind of foofy-foof-foof tone–subdued and, I thought, pleasantly sophisticated.

It was this mellow, sedate sound that I brought with me to the student big band at Aquinas College, where I sat under the august directorship of jazz professor Bruce Early. I was assigned to the first alto chair, and my lack of experience was such that I felt eminently qualified to fill the position. Clearly word of my abilities on the sax had preceded me, and Bruce had simply placed me where he knew I belonged. First chair. It was inevitable.

I’ll never forget my first awakening to the possibility that maybe I wasn’t all that and a supersized order of fries. The band was playing through some tune I’ve long since forgotten, and in the middle of the chart there was space for an alto solo. Cool. A chance for me to show my stuff, give Bruce a taste of my chops. I launched into the solo. Foofy-foof-foof, I played, subtly, while the rhythm section whanged away.

Bruce stared at me. “Play louder,” he said.

Ah. Louder. Okay then. Foof-foof-foofy-foof! I declared, in a volume that could almost be heard from ten feet away.

Bruce’s stare became a glare. “Louder!” he barked.

My gosh, what did this guy want? Here I was, foofing as loudly as ever I had foofed, and Bruce was calling for more.

I returned his glare with a desperate glance.

Foof? I played. Foofy-foof!

I was trying, but I quickly trended toward the softer, cocktail lounge volume that I was used to.

That did it for Bruce. “BLOW!!!!” he yelled. “For crying out loud, BLOOOWWWWW!!!!!!”

Some of the more seasoned musicians snickered, and my face went red as a beet. Hell’s bells. Fine, if it was volume Bruce wanted, I’d give him volume. And I did. I had a lot to learn about embouchure and tone production, but at that point I instinctively dipped into the raw essentials, filled my lungs with air, and blew my ever-loving cheeks off.

From that time on, while Bruce yelled at me for any number of things, my volume level wasn’t among them. He never again complained that I was playing too softly. Nor has anyone else, for that matter. Not ever. I’ve played with highly amplified blues bands and church worship teams and outblown them without using a microphone. I’ve been asked plenty of times to turn it down a bit, please. But no one has ever come to me and said, “Could you play louder? I can barely hear you.”

Just ask Dave. He’ll be glad to tell you, as soon as his ears stop ringing.

Using Sequence in Jazz Improvisation

Okay, campers, listen up: it’s time to talk about…

SEQUENCE.

Yes, sequence. A fundamental building block of music, and a very handy device in the improviser’s toolkit.

What is sequence? There’s nothing mysterious about it. Sequence is simply the repetition of a melodic idea beginning with different tones. Sequence can be diatonic within a key, and many scale exercises consist of scale material organized sequentially. Sequence can also be an exact, interval-for-interval repetition of a motif (or lick), which often–indeed, almost inevitably–will take you out of key.

The beauty of sequence lies in the coherency it brings to a solo. Sequence is a means of organizing melodic material in a way that the listener can immediately relate to. In the midst of a free-form flow of melody, sequence provides a sense of logic, a momentary theme for the ear to latch onto and follow through one or more permutations.

In its simple, diatonic form, sequence creates interest as you navigate your way through a single scale, chord, or ii-V7-I cadence. But sequence can also be used to take you out of key The strength of repetition has a way of making “wrong” notes sound right–a quality that becomes increasingly important when you’re playing tunes with little in the way of harmonic interest. When you’re in the midst of a two-chord jam, diatonic scales get boring pretty quickly. You’ve got to create energy. How? By using chromaticism–tones outside the key center that add color. Sequence is a great way to do so in an organized fashion.

Now, one picture is worth a thousand words, right? “Don’t tell me, show me,” is what you’re thinking. Relax. I’m not going to leave you hanging without a few examples. I’ll provide some material you can practice in an upcoming post. Right now, I just want to introduce the concept of sequence and whet your eagerness to get a few exercises under your fingers.

“But I want to start noooowwww!!!

Patience, Grasshopper. It’s Saturday afternoon, it’s spring, and I want to get out and enjoy the day. Stay tuned, though. I’ll be back with a few goodies. Promise.

Michigan in January: Cold Snap and Hot Music

The single-digit temperatures are here at last, and it looks like they’ll be staying for a few days.

Tonight the mercury is supposed to dip down to ten below zero. That, my friends, is cold. Tomorrow, the projected high–and we”re using that word, high, loosely here–is seven degrees. Think twice before wearing your thong swimsuit to the beach. Particularly if you’re a guy. (For that matter, if you’re a guy, think twice about it any time of year; better still, just don”t do it.)

On Friday, we see the kind of warming trend that puts a smile on the faces of Michiganders everywhere as the temperatures skyrocket up to nine degrees. And by Saturday, we”re feeling downright tropical at a steamy twenty degrees.

This is most assuredly January in Michigan. It”s the month of the Wolf Moon, an apt name if ever there was one. At night, as the temperatures plummet and the stars gleam like ice chips in the arctic sky, you can hear the howls echoing eerily across the frozen lakes. It”s a haunting, wild sound that you never forget, emanating from ice fishermen who are freezing their butts off. What those guys are doing out there in temperatures like these is beyond me.

nOkay, so enough about cold weather. How about a word on a hot CD? My friend Ed Englerth‘s album Restless Ghost has been nominated for a Jammie Award. The Jammies are the regional equivalent of the Grammies–not as prestigious, to be sure, but not lacking in glamor and promotional value. It would be great if Ed scored, particularly since I played on a number of songs on the CD. It really is a great album, and Ed is a terrific songwriter and lyricist who deserves much wider recognition.

Using Substitute Dominants

Sooner or later, if you haven’t done so already as a jazz improviser, you”re going to want to broaden your harmonic palette with substitute dominant chords.

Say that term, substitute dominant, and what immediately springs to mind for most musicians is what is also refer to as a tritone substitute, so called because the root is a diminished fifth–a tritone–away from the root of the dominant seventh chord in any given key. For instance, let’s say you’re in the key of C major. The dominant of C is G7. In traditional theory, the G7 is a major/minor seventh chord.

If you drop down a tritone from the G7 and build another major/minor seventh chord, you wind up with a Db7. That is your tritone substitute, the most commonly used substitute dominant.

Note that the Db7 is just a half-step above your tonic chord, C major. Now, you could use a a Db Mixolydian mode with it. But another good choice would be a Db Lydian flat seventh scale–i.e. Db, Eb, F, G, Ab, Bb, Cb, and Db octave. Note that, as is so often the case, a single note makes all the difference. In this case, simply raising the fourth scale degree of the Db Mixolydian mode a half-step, from Gb to G, gives you the Lydian flat seventh scale.

Now, here’s where things get particularly interesting: let’s say you want to inject a little color with an altered dominant, a G+7(#9). That chord immediately suggests that you”ll use a diminished whole tone scale. Guess what? The diminished whole tone scale uses the same notes as the Lydian flat seventh scale; the only difference is, it starts on the G instead of the Db. So in this case, you can use the same scale for either the altered dominant or the substitute dominant! Nice, eh?

One of the earmarks of the tritone substitute is that it flipflops the third and the seventh, which are critical tones in the function of the dominant sound. The flat seventh of the V7 chord is the third of the bII7 chord, and vice-versa. This means that no matter which chord you use, dominant or substitute dominant, the tritone interval between the third and the fifth remains, with all its tension that demands resolution to the tonic chord.

Using the substitute dominant in a ii-V7-I progression gives you ii-bII7-I. You can also alternate the dom/subdom sound on your journey toward the I, thus: V7-bII7-I.

By the way, the tritone substitute is nothing new. In Bach”s day, it was called a Neopolitan chord. Jazz is deeply rooted in European harmony; the genius behind it lies, in part, in how African American musicians fused that harmony with tonal colors and rhythmic approaches that no Western musician would have dreamed of. Jazz truly is a distinctly American art form.

Jazz Improvisation E-Book: Another Update

Writing an e-book on jazz improv is definitely a challenge. The going is slow, since I’m still faced with the exigencies of life and the need to make a living. That being said, though, I am making progress.

In the process of writing, I find myself necessarily considering my approach. Any number of ways exist to accomplish the same end in jazz. A whopping amount of educational material also exists that says pretty much the same thing. After all, this isn’t a new topic, and I”m hardly the first person to write about it. How, then, can I offer value–something not different merely for the sake of being different, but something whose distinctions can help budding improvisers to better grasp at least some of the essentials of jazz craftsmanship?

As a street-level, self-appointed educator rather than a degreed, college-level didact, I myself am learning by doing, and my first lesson has been: start simple. I can’t possibly cover all there is to know about jazz improvisation in one book; such a book would have no end, and besides, I myself have still got plenty to learn. So I”ll probably write several books. This first effort will be for beginning improvisers. Note that I didn’t say beginning musicians. I”m assuming that anyone with an interest in improvisation already knows the basics of music theory, and while I do cover some of those basics, readers should already understand how a major scale is built, and what the church modes are, and what intervals are, and triads, and seventh chords, and so forth. Such things comprise the building blocks of all Western music; my interest is to help aspiring jazz instrumentalists assemble them in a way that fits the overall jazz genre.

In my approach, I hope to help players connect their inner ear with technical finesse, so that technique and the ability to “hear” develop together. We want to be able to not only conceive cool lines, but also to “feel” them in every key, even the weird keys such as concert E, B, or F#.

At the moment, chapter four is underway. It covers the unaltered dominant seventh chord and the Mixolydian mode. No need to say more, other than, stay tuned.

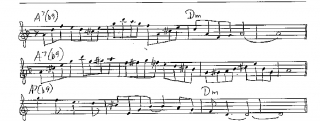
Phrygian Dominant Licks: Capturing the Essence of Minor Bebop

The harmonic minor scale was the first scale I learned to apply in a minor jazz setting over an altered dominant chord. No doubt that was because it was the easiest, but it also seemed to me to be the most consistent with the vocabulary of bebop a la Charlie Parker. Just as a given major scale generates the appropriate Mixolydian mode for the dominant of its key, so a harmonic minor scale produces a scale that works well with its dominant. Known as the Phrygian dominant (aka Jewish scale, Gypsy scale, or Spanish scale), this scale works beautifully with V7b9 chords. With its lowered sixth, and with the minor third interval between its lowered second and major third, it possesses an evocative, Eastern quality that makes me think of belly dancers and snake charmers.

The scale you’re likeliest to learn as the first choice for V7b9 chords is the half/whole diminished. It’s certainly a time-saver, as you need learn only three of this symmetrical scale in order to know all twelve. But the Phrygian dominant has an exotic beauty to it that the diminished scale doesn’t quite capture, and a built-in ease of use rooted in its relationship to the parent minor key.

In a previous post, I offered a couple of written exercises on major triad couplets. Now, in the spirit of Bird, here are three licks utilizing the A Phrygian dominant scale. The first and third one resolve to the tonic chord of D minor; the second is just a straight A7b9 lick, but you can still resolve it to the D minor–it just waits longer to define that chord.

As always, memorize each exercise in all twelve keys. And have fun!

[ADDENDUM: I just noticed that, in the third exercise, I didn’t include a Bb in the key signature. Please mentally insert it so you’re playing in the key of D minor and the ninth of the A7 chord is flatted.]

Michael Brecker on Practicing

Oh, man! Gold mine! Check out this video of Michael Brecker talking about his practice regimen.

I find two things particularly noteworthy:

1. As phenomenal a saxophonist as Michael Brecker was, he never considered himself to have arrived. He continued to practice voraciously, experiencing the same ebbs and floes in his woodshedding and musical growth as anyone else.

2. Michael was always reaching for new ideas. But it took him a long time and hard work to master those ideas. In his own words, he was a slow learner.

Huh? Brecker–slow? Gee, I guess the guy actually had to pay real dues to become as good as he was.

One aspect of inspiration is encouragement. I find it encouraging to think that Brecker was actually human. He didn”t just come out of the womb playing the saxophone that brilliantly. He sweated over his instrument.

Of course I already knew that. Still, listening to those recordings of Michael, I lose track of the fact that he wasn”t superhuman. Gifted he was, most definitely, but he still had to do what any of us have to do in order attain proficiency on our instrument: practice. Hearing someone who played at such a high level talk so openly and humbly about his personal challenges in continuing to grow musically…well, it just helps, that”s all. I mean, for all the time I”ve spent working on my horn, I sometimes get discouraged thinking how much I have yet to learn, and how long it has taken me just to get to where I”m at.

So I appreciate a guy like Michael Brecker sharing so transparently. His doing so helps me realize I”m no dummy. I”m just normal. And I”m in pretty good company.

Kudos, by the way, to Jazz-Sax.com, where I found the above YouTube clip. It”s a site you”ll definitely want to check out and add to your bookmarks.