Sax Practice: A Chromatic Motif on the Cycle of Dominants

If you want to develop fluency at voice-leading and switching keys, cycle exercises are mandatory and the cycle of fifths is supreme. Taking dominant patterns and licks around the cycle of fifths is a longstanding habit of mine. As with a lot of musical disciplines, at first I delayed, I kicked, I resisted tackling this one for a long time because, well, it was work. Finally I decided to buck up and eat my spinach, and today the circle of fifths is a key component of my practice regimen, particularly for V7 chords.

After all, the dominant seventh, more than any other chord, defines the key center; it’s the chord that screams “resolve me!” So it pays for sax players and other jazz improvisers to consistently drill their ears and their fingers with exercises that can build their facility with dominant seventh chords.

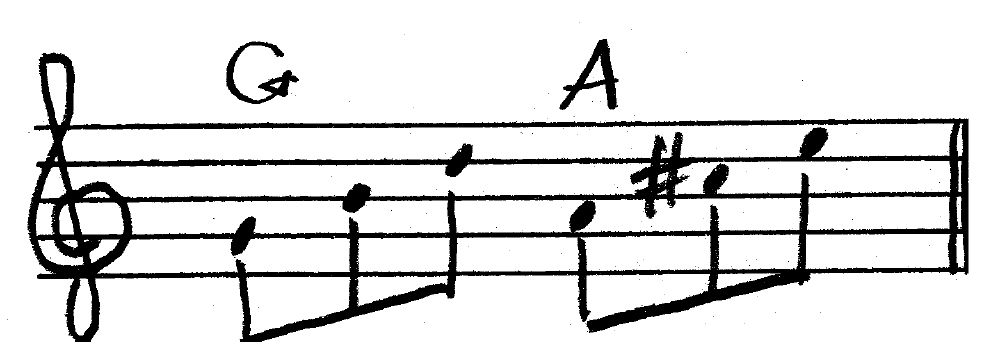
Here’s one such exercise that I’ve been having fun with lately. Click on it to enlarge it. There’s nothing mysterious about this little motif; I could pull it off easily in a number of keys right where I stand without making a practice issue of it. I’ve practiced enough related material that my fingers already know the way. But spotlighting the figure makes it likelier that I’ll use it in my solos; it ensures that my technique will follow me into any key; and, as with all cycle of fifth exercises, it helps me hear how the pattern lays out in root movements by fifth.

For each dominant chord, the exercise ascends chromatically from the ninth to the third, and then from the root to the seventh. I’ve set it in triplets, but you’ll want to experiment with different rhythms.  I might add, this little motif sounds great in blues solos.

No need for me to say more–except, of course, to pester you to check out more exercises on my jazz page. Have fun practicing!

Shifting Meters: Energize Your Solos with Implied Polyrhythms

Okay, sax players and jazz soloists, I haven’t forgotten you! I’ve been quite focused on the weather recently, but I’ve also been practicing my horn pretty industriously, and, in the words of the old pop classic, you were always on my mind.

It’s high time I wrote a musical post. This one ought to give you a little something to thrash with. The bit in the headline about “implied polyrhythms” sounds impressive, but I’m not sure it’s entirely accurate. I just don’t know what other term to use–I don’t think “hemiola” is quite right. So we’ll go with “polyrhythm” for the sake of having some kind of handle of nomenclature with which to pick up our suitcase of application.

The concept itself is simple: by taking a pattern that normally lays well in triplets and recasting it in eighth notes, or vice-versa, you automatically rearrange the way that certain notes are accented. The result is usually some pretty cool syncopation that will grab your listeners by the lapels, throttle them into submission, and make them hand over their wallets. Well, okay, nothing that dramatic, but it should certainly get their attention.

Since your eyes and ears will explain to

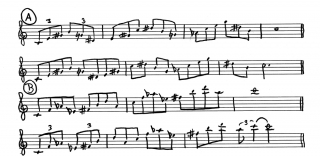
you what I mean better than my words can, to your right you’ll find a couple of examples. Click on the image to enlarge it, then print it out and take it with you to the woodshed.

The first line of example A features triplet arpeggios on the augmented scale. The following line uses exactly the same note order, but converts it to eighth notes.

Example B shows you how the concept works in reverse, taking a simple sequence of fourths in duple meter and converting it to triple meter.

The result is hipness, pure and unmitigated.

Experiment with this concept. And don’t limit yourself to just triplets and eighth notes. You can reframe any odd grouping of notes into eighth notes or sixteenth notes, and the converse also applies. The practice of translating one meter into another is no mystery, and if you’ve been playing the sax for some time, you’re probably already an old hand at doing so. It’s a nice way to spice up your improvised solos with rhythmic energy.

That’s all for tonight. There’s a bottle of Double Crooked Tree Imperial IPA sitting in the fridge, and its siren song is too powerful for me to ignore any longer. For more articles on jazz improv, including exercises and transcribed solos, visit my jazz page.

Exploring the Lydian Flat Seven Sound (or, Ruminations on a Flatted Fifth)

Hey, there, fellow jazz saxophonists and other jazz instrumentalists, I haven’t forgotten you! Even as I’ve been blogging about the big, late-October weather system that has been blowing through the Great Lakes, I’ve been contemplating my next post for sax players. I hope you’ll find that what follows was worth waiting for.

A riff from Jimmy Forrest

Back in my college days, Basie tenor man Jimmy Forrest lived in Grand Rapids. Naturally, I owned one of his albums, a vinyl LP titled “Black Forrest.” It was a hard-swinging, straight-ahead collection of tunes that showcased Jimmy’s ability to deliver both high-testosterone bebop and wonderfully lyrical balladry. The album included a heaping helping of blues, and in one of those blues, Jimmy worked into his solo a lick reminiscent of the old Jetsons cartoon theme song, which sounded something like this:

I liked that lick, and I incorporated it into my blues playing. The thing that made it sound so hip was the sharped fourth–aka the flat five, though in this application, that’s not the correct theoretical term–which defines the lydian sound.

What makes lydian sound so lydian?

Good question. There are two scales that can be considered lydian: the traditional lydian church mode built off the fourth degree of the major scale, and the lydian flat seven scale, also known as the lydian dominant.

The term “lydian dominant” is a bit confusing, since each word, “lydian” and “dominant,” suggests a function of the scale that cancels out the other one. In this case, however, “lydian” refers to the raised fourth scale degree, and “dominant” describes how the scale and its characteristic chord function. The more accurate term is actually “mixolydian sharp four,” since the scale is used the same way that a standard mixolydian mode is used: as a scale choice for dominant seventh chords.

Whatever you wish to call it, the lydian flat seven sound is defined by its raised fourth scale degree. But other scale options for dominant seventh chords also contain the raised fourth/flatted fifth. The half/whole-step diminished scale and the diminished whole tone scale both come instantly to mind. What makes the lydian flat seven different?

Its consonance with an unaltered dominant seventh chord.

Following is a G lydian flat seven scale, which you would use over a standard G7 chord:

Lydian_Dominant_Scale

Note that this scale neither raises nor lowers the ninth of the G7, nor does it alter the fifth, nor does it lower the thirteenth. Only the fourth degree gets raised a half-step to create the characteristic lydian sound. The raised fourth doesn’t clash with the third of the dominant chord the way that the unaltered third of the standard mixolydian mode does, in effect making the lydian flat seven scale the more consonant scale.

Triad superimposition

When you build triads off of the first and second degrees of the lydian flat seven scale, each triad is major in quality. For instance, a G lydian flat seven scale gives you the following:

Lydian_Triad_Couplets

Note that the first triad outlines the foundational notes of the G7 chord, minus the seventh, while the second triad emphasizes the ninth, raised fourth, and thirteenth. Thus,  a quick way to emphasize the lydian sound over a dominant seventh chord is to superimpose a major triad whose root is a whole step above the chord root. In other words, if you’re soloing over a Bb7, play a C major triad; if you’re working with a D9, play an E major triad, and so forth.

By the way, since neither triad includes the seventh of the scale, you can apply the above superimposition equally well to both the G7 and Gmaj7 chords.

Major triad couplets in inversion for the lydian sound

Okay, time to start getting the stuff I’ve just covered into your fingers and your ears. Click on the exercise to your right to enlarge it. It’s a practical extension of the superimposition principle I’ve just described that takes you through different inversions of the triad couplets based on the G lydian flat seven scale. As always, take the exercise up and down the full range of your instrument, and through all twelve keys.

I’ll have more to say about the lydian flat seven scale, but this ought to keep your woodshed smoking for a while.

Visit my jazz page for more articles on jazz improvisation, jazz theory, and saxophone playing.

How to Master Circular Breathing on the Saxophone

It has been so many years since I first learned how to circular breathe that I rarely give the matter a thought anymore. It occurs to me, though, that to many sax players, circular breathing remains a technique shrouded in mystery.

There is, after all, something about it that appears almost miraculous. Most saxophonists would be challenged to hold a tone for thirty seconds. So how on earth did saxophonist Vann Burchfield manage to sustain a single note for 47 minutes, 6 seconds, in 2003, beating the previous record set by Kenny G of 45 minutes, 47 seconds? (An even more interesting question is, why did he do it? But the point of this article is to discuss the mechanics behind such a feat, not the psychology.)

Sensationalism aside, circular breathing is a useful technique with practical benefits for those who add it to their tool kit. But how does one go about doing so?

Begin by understanding the basics of how circular breathing works.

The principle is fairly simple (which is not to say, easy to master). You support your tone with air from your lungs in the usual way. However, when your air supply begins to dwindle, you store a quick reservoir of air in your cheeks. Then, closing off the back of your throat, you sustain your tone by contracting your cheeks while simultaneously–and very quickly–replenishing your lungs with air by breathing in through your nose.

This accomplished, you reopen the back of your throat and once again blow from your lungs. Repeat the procedure as often as necessary.

It sounds tricky, and it is at first, but the essentials really aren’t any great secret. Like any discipline, though, circular breathing takes time and persistence to master. Once you’ve got the hang of it, you’ll find that you’re able to continue playing indefinitely, spinning out lines for as long as you please without having to break the flow.

Here’s a simple, step-by-step process to get you started.

1. Get in touch with your air reservoir. How do you do this? Simple: take a breath and then puff out your cheeks. Now continue to puff out your cheeks while breathing in and out through your nose. Note how the back of your throat automatically closes in order for you to accomplish this, sealing off a reservoir of air in your mouth that keeps your cheeks “inflated” while your lungs continue their normal breathing rhythm.

2. Repeat the above procedure. But this time, blow a controlled stream of air through your lips, allowing the reservoir of air in your cheeks to empty itself like a leaky balloon. When you start losing pressure in your cheeks, then–without interrupting the air flow through your lips–breathe in through your nose and then release the air from your lungs into your mouth, replenishing the reservoir of air. Then close off your throat again. Continue doing this till it seems easy (which will probably happen fairly quickly because it is easy, much easier to do than it is to describe!).

The objective is to maintain a steady air stream through your lips while opening and closing your throat to replenish your air reservoir.

3. Till this point, the focus has been on getting a feel for the air reservoir in your mouth/cheeks. The reservoir is key, but in circular breathing, you’ll only use it for the second it takes to fill your lungs with air, after which your throat remains open and you blow in the normal fashion.

So in this exercise, blow a steady stream of air through your lips, allowing the pressure to puff out your cheeks, but support the air stream from your lungs. Keep it going for five or ten seconds, until your lungs begin to empty. Then close off your throat and keep the air stream moving by using the air in your mouth reservoir, as in exercise number two. Simultaneously, inhaling through your nostrils, fill your lungs back up with air. Then open your throat back up and blow from your lungs once again.

4. Once you can comfortably and consistently perform the above exercise, you’ll have gotten your arms around the essentials of circular breathing. At this point, you are in fact performing the technique. Now it’s just a matter of transferring it to your instrument.

When I was first learning to circular breathe, I found it helpful to work with the soprano saxophone. Assuming a conservative reed/mouthpiece combination, the soprano uses less air than the larger horns, making the learning curve easier. If you’ve got a soprano sax, I highly recommend that you practice circular breathing on it before you try it on your alto or tenor.

Start by seeing how long you can sustain a single tone in the middle register of your instrument. The note C on the staff works great. Avoid extremely high and low notes for the time being. Concentrate on making a smooth transition between lung support and reservoir support, striving for minimal pitch wavering, change in volume, and certainly break in tone when closing and reopening the back of your throat.

From here on, gaining proficiency is just a matter of focused, self-analytical practice. However, there are…

A few things to be aware of.

These involve the way you use your mouth reservoir to sustain a tone.

In the above exercises, you’ve had your cheeks puffed out and allowed the air to leak out of them in a controlled stream. Once you start blowing through a mouthpiece, you’ll find that things aren’t quite so easy. The air goes at a faster rate, and you need to contract your cheeks like a bellows in order to provide enough air pressure to sustain a tone on the horn.

Ultimately, of course, you want to dispense with puffing out your cheeks as much as possible. Cheek-puffing is handy as a preliminary learning device, but it’s ruinous on intonation and good breath support. As you spend time refining your circular breathing technique, you’ll find that you can exert air pressure from the back of your throat by lifting your tongue forward. I don’t know how better to describe what I’m getting at, but I’m quite certain that you’ll discover it for yourself if you continue to practice circular breathing.

Once you’re able to sustain a single tone with reasonable control, try playing a scale using circular breathing. From there, try a favorite lick. Circular breathing while playing lines is challenging at first, but once you’ve acquired the ability, you’ll find that moving notes are actually more forgiving than long tones. They tend to mask the unwelcome waver that often attends the shift in air support.

And that, my friends, is that. My job is done. Yours is just beginning. Grab your horn and get started.