Practicing “Giant Steps”: Static and Chord Tone Sequences

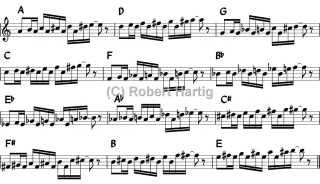
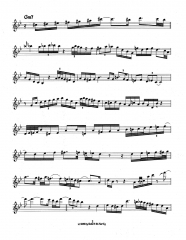
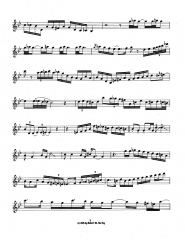
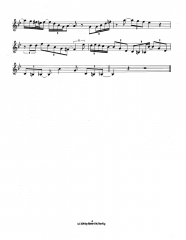
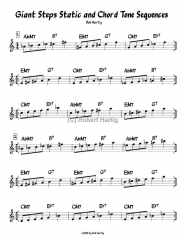
Here are some more exercises on the Giant Steps cycle. (Click on the image to enlarge it.) While it might not be immediately apparent, the linear patterns shown here are actually a continuation from my previous post on isolating V7s in the cycle. Note that the V7 chords are still spotlighted by emphasizing them with quarter notes, which are led into by the preceding grouping of eighth notes. Think of the dominant harmonies as target tones preceded by a walk-up.

In these exercises, I’ve elected to focus on the treadmill-like cycle of Coltrane changes rather than the full eight-bar A section of “Giant Steps.” As is typical of so much of the practice material in my posts, what you’re getting here comes straight from my own current explorations and discoveries in the woodshed

Don’t be cowed by this post’s heady subtitle, “Static and Chord Tone Sequences.” I’m just not sure how else to describe this material. The goal I’m after is to work with linear sequences that will drill the shifting tone centers of Coltrane changes into my fingers. (Geeze, that still sounds murky as all get-out. Oh, well. Deal with it.)

Since I’m an alto sax player, I’ve written these exercises in the Eb transposition. If you play a Bb or a C instrument, you’ll need to transpose accordingly.

Exercise one proceeds through the entire Giant Steps cycle in three bars. The first three-bar cycle starts on Ab; the second, on E; and the third, on C. In each series, I’ve kept the first note of each measure as static as possible, shifting it by just a half-step in the third measure to accommodate the change in key.

In exercise two, the harmony continues to repeat itself (i.e. AbM7 to B7, back and forth) while the starting tone for the eighth-note groupings shifts, progressively, from the root to the third to the fifth.

In both exercises, pay attention to which target tones you arrive at in the dominant seventh chords.

And that’s enough of me talking. Dig in, engage your analytical thinking along with your fingers–and, as always, have fun!

Oh, yeah–if you enjoyed this post, please check out my many other articles, practice exercises, solo transcriptions, and video tutorials for improvising musicians.
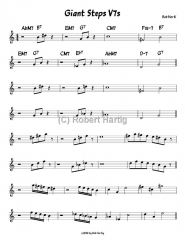
Practicing “Giant Steps”: Isolating Dominant Sevenths

I’ve recently been focusing on the Giant Steps cycle during my practice sessions, with the thought that at some point soon, once I’m ready for prime time, I’ll record myself. It seems only right that a guy with the audacity to write a book of Giant Steps licks and patterns ought to furnish some evidence that he can actually play the tune. So I’ve been getting myself up to snuff.

But it’s one thing to play “Giant Steps” and another thing to play it creatively. As you know if you play or have attempted to play the tune yourself, the A section in particular is a challenge. So I was pleased with the breakthrough of sorts that I experienced the other night, which I continued to explore during this evening’s practice with good results.

In the changes to “Giant Steps,” bars 2–3 and 5–6 alternate tonic major chords with dominant seventh chords in a framework of rapid modulations through three key centers spaced a major third apart. For the Eb alto sax, the first two bars proceed thus: AbM7 B7 / EM7 G7; and bars five and six are as follows: EM7 G7 / CM7 Eb7. You can distill all of that into a single cycle, thus: AbM7 B7 / EM7 G7 / CM7 Eb7, after which the cycle repeats itself.

I’ve tended to focus on the major chords–in other words, the first chord in each measure. But I’m finding that spotlighting the dominant seventh chords is helping me to improve my command of the changes. For practice purposes, my approach–or at least, part of my approach–is to omit the major chords entirely, forcing me to think exclusively about the dominant chords and what I want to do with them. Right now I’m keeping it simple, sticking with essential chord tones. In a while, I’ll start altering upper extensions and probably incorporating tritone substitutions. But first I want to get basic chords drilled into both my fingers and my mind.

On this page I’ve included a few simple patterns that I’ve been working with. (Click on the image above to enlarge it.) They’re nothing fancy, and they’re not intended to be. But if you work with them when you practice “Giant Steps,” I think you’ll find that they make you think in a different way which will help you wrap your mind around the changes better.

These patterns are just to get you started. I encourage you to make up your own patterns, and don’t be shy about using wider intervals such as fifths and sixths. I should add, at the risk of stating the obvious, that you should transpose the patterns according to the dictates of your instrument: up a minor third for flute, piano, and other concert pitch instruments, and up a perfect fourth for Bb instruments such as the tenor sax and trumpet.

Practice hard and have fun!

How to Flutter Tongue on the Saxophone

Most days back when I was in elementary school, my friend Pete Rogers brought his submachine gun to school. It was a formidable weapon that Pete employed with withering effectiveness during the war games we boys played at recess, and it possessed the added advantage of instant disassembly into just two components which bore a striking resemblance to Pete’s right and left hands.

As the enemy approached us on the battlefield, Pete would make pistols out of both hands, jam the barrel of one pistol into the other hand behind the base of the thumb, and presto! Instant Tommy gun. “D-D-D-D-D-D-D-DOOOWWWWWW!” Pete would yell, doing a convincing imitation of a kid simulating automatic weapon fire. “D-D-D-D-D-D-D-D-DOOOOOWWWWWWWW!!!” And into the fray he’d charge, he and his handufactured submachine gun. Pete was impressive.

I envied him. Like the rest of the boys, I had to consign myself to plain old bolt-action–until one day, I figured out Pete’s secret for making his machine gun sound. The sound, after all, was the thing. There’s no point in having a machine gun if you can’t fire it. I discovered how.

By placing the tip of my tongue lightly but firmly against the roof of my mouth–not directly behind my teeth, but more toward the center of my palate–and then directing a steady stream of air against it, I could get my tongue to flutter, generating a rattling t-t-t-t-t-t-t-t-t-t sound. Mimicking Pete’s machine gun was then just a matter of adding my vocal chords to the mix.

Now that I was onto Pete’s secret, naturally I customized it to fit my taste. Pete’s sound was loud. I opted for a subtler approach–a Tommy gun with a silencer, if you will. A stealth machine gun. By fluttering my tongue right up against the top of my clenched teeth, and by not using my voice, I managed to produce the coolest, most convincingest machine gun fire you ever heard. It outclassed Pete’s prototype hands down. From then on, my lunch hours were littered with the bodies of scores of enemy soldiers who fell under the subtle but deadly chatter of my .50 caliber finger.

Years later in high school, long after my boyhood war games had ended, I discovered another use for my machine gun sound. By employing it while playing my saxophone, I was able to produce a wild, burry kind of effect. I didn’t realize that what I was doing had an actual name–flutter tonguing–or that R&B saxophonists such as Junior Walker incorporated it as part of their trademark sound. I thought of it as simply an interesting but useless curiosity.

Of course I was wrong. Flutter tonguing can be eminently useful depending on the kind of sound you’re after. I don’t use the technique often, but I can and do pull it out of my pocket occasionally, and so can you whenever you wish. Flutter tonguing is not hard to learn.

Here’s How to Flutter Tongue on the Saxophone

Actually, if you were paying attention, you already know how to flutter tongue. Re-read the fourth paragraph. It describes the basics. Give it a try. No saxophone–just make the machine gun sound (leaving out the vocal part). You want to use my buddy Pete’s approach, not my refinements. Your tongue needs to touch closer to the center of your palate rather than directly behind your teeth.

Once you’re able to produce the rolling, machine-gun-like effect I’m talking about, try it with your horn. Bear two things in in mind:

• You’ll probably need to take in less mouthpiece than you normally would.

• You should not let your tongue touch the reed. Flutter-tonguing isn’t really tonguing in the usual sense; it is not a form of articulation such as single-tonguing or double-tonguing. Rather, your tongue flutters rapidly against the roof of your mouth as you blow into the mouthpiece. If your tongue actually touches the reed, it will choke off the sound.

Flutter tonguing is easiest to use in the middle register of your horn. With practice, you can work your way higher. And with practice, you can also play reasonably in tune. I say this because flutter tonguing can flatten your pitch if you’re not careful. So while the basic effect isn’t particularly difficult to produce, getting it to a point of usefulness may take a bit of work. Overall, though, flutter tonguing is in my experience one of the more easily acquired effects. Compared to mastering double-tonguing or the altissimo register, it’s a cinch.

I may create a video clip of my own to demonstrate the flutter tonguing technique. Meanwhile, this one by Phil Baldino does a great job of letting you see and hear how it’s done.

Master “Giant Steps” in All 12 Keys with The Giant Steps Scratch Pad Complete

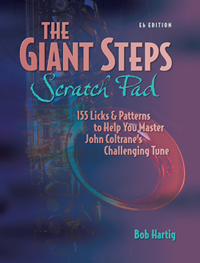
Excuse me while I deviate from this blog’s generally non-commercial tone into a bit of blatant self-promotion. As you know if you’ve followed the musical part of Stormhorn.com for any length of time, I’ve self-published a practice resource for jazz musicians titled The Giant Steps Scratch Pad. Without going into details that I’ve already covered on the Scratch Pad page, the original editions provide 155 licks and patterns in the standard key for concert pitch, Bb, Eb, and bass cleff instruments.

This new edition takes that effort to the ultimate level for those who want to master John Coltrane’s jazz rites-of-passage tune, “Giant Steps,” in every key. Available now as an instant PDF download,The Giant Steps Scratch Pad Complete gives you a grand total of 1,860 exercises written in treble clef.

Speaking modestly but plainly, this is a terrific resource for jazz musicians. It gives you enough theory to help you understand Coltrane changes in the context of “Giant Steps”; however, its focus is on getting you actually playing through the changes comfortably and creatively. To the best of my knowledge, no other book like it exists that provides a practical and comprehensive means of mastering “Giant Steps.”

Written in treble clef, The Giant Steps Scratch Pad Complete is 252 pages in length and costs $21.95. As I’ve already mentioned, it is currently available as a PDF download only. That seems to be what people prefer, and I’m reluctant to invest more time and effort preparing a print edition unless I know there’s a reasonable demand for one. I’d have to charge more to make it worth my while, and you’d have to pay for shipping on top of the purchase price.

However, given the size of this new, complete edition, there may be an interest in a print version, so let me know. Enough requests can make the difference. And I will say that the cover which I had professionally designed for the standard-key editions looks very sharp, better than most of what I’ve seen in music stores.

To place your order, or to learn more about The Giant Steps Scratch Pad and check out printable page samples, click here.

Also, if you like what you find, please tell your fellow musicians. Self-publishing means self-marketing, and the best way to accomplish that is through word-of-mouth. Nothing means more to other musicians–and to me, personally–than the recommendation of a colleague.

Thanks for your interest and for spreading the word!

–Bob

The Giant Steps Scratch Pad in All 12 Keys Is Nearly Finished!

A quick report on the upcoming all-keys edition of The Giant Steps Scratch Pad. It’s almost finished! In fact, I had hoped to publish it today, but I ran into one of those inevitable last-minute snags that I won’t be able to fix until tomorrow.

However, while the problem is irritating, it’s easily resolved. So assuming that nothing blows up in my face, I should be able to make this new edition available for sale as a PDF download sometime tomorrow.

I’m titling it The Giant Steps Scratch Pad Complete: 155 Licks and Patterns in Every Key to Help You Master John Coltrane’s Challenging Tune. Right now my plan is to sell the book strictly as a PDF download. However, at 250 pages, it may be practical for me to also offer it as a softcover print edition. I’ll welcome your feedback on this, so please click on the “comments” link if you wish to share your input.

Technique-Builder: Intervals within a Perfect Fifth

Here’s a little exercise that can help you get handy with the basic intervals between the root and perfect fifth of a triad. Click on the image to enlarge it. I normally run the pattern over major-quality chords, but it should work fine over minor as well. For that reason, I’ve shown only chord roots over each bar without getting more specific about chord quality.

Other than that, I don’t think the exercise needs much explaining. It’s a nice way to build your chops, and it’ll also open your ears, particularly if you play it slowly enough to clearly hear the different intervals.

If you find this exercise helpful, you’ll find many more like it on my Jazz Theory, Technique & Solo Transcriptions page.

Coming Soon: The Giant Steps Scratch Pad in All 12 Keys

My book The Giants Steps Scratch Pad is enjoying modest success. While it’s not flying off the shelves, musicians are buying it, and I find that gratifying because I haven’t done much to market it other than display it on this and a couple of other jazz websites, and run a few ads in Craigslist.

Available in separate editions for C, Bb, Eb, and bass cleff instruments, the book supplies 155 licks and patterns designed to help jazz instrumentalists master the Giant Steps cycle. To the best of my knowledge, there’s no other resource out there like it that helps musicians actually practice Coltrane changes. The closest I’ve seen has been for guitar players.

But enough about that. If you want to learn more about The Giant Steps Scratch Pad, visit my sales page. This post is to announce the upcoming release of a new edition of the Scratch Pad that covers all 12 keys.

I’ve had this edition in mind for a while. I finally got the project underway but have held back announcing it until I felt certain that I’d see it through to completion. Today, with just three keys left to go, I think it’s safe to say that this new, all-keys edition is gonna happen. I hope to wrap up the main grunt work within the next few days. I wish it was as easy as simply hitting the transposition button on MuseScore, but while transcription software is great, it doesn’t eliminate the need for hands-on editing. So I’ve been sifting through each key page by page, changing the range where necessary, correcting wrong notes, inserting and deleting accidentals, and so forth.

Once I’m finished, I’ll proofread the results to make doubly sure that the manuscript is glitch-free. Then I’ll assemble the whole lot and make it available as a PDF download. I will not offer it as a print edition through Lulu.com unless I get requests to do so. Judging from my sales of the present editions, people would much rather download the PDF and get the guts of the book instantly for cheaper rather than pay the shipping costs (even though the full-color cover looks sooooo sharp!). And I’m fine with that. Prepping a print edition is a lot of extra work; I have to charge more for it in order to make less than half the profit; and Lulu’s insistence on putting a single, slim book inside a cardboard box that costs nearly $4.00 to ship is just plain crazy, not to mention a sales-killer.

Anyway, stay tuned. It’ll still take a week or two, but The Giant Steps Scratch Pad for all 12 keys is on the way. I haven’t determined the price yet, but it’ll be reasonable, something that’ll let you still pay your utility bills while helping me to pay mine. I should add that this edition is written in treble clef. I may do a bass clef edition in all 12 keys as well–I’m not sure right now. One thing at a time.

The Fear of Cloning

The name of the tune is “Gunslinging Bird,” but the name originally given it by Charles Mingus was, “If Charlie Parker Were a Gunslinger, There’d Be a Whole Lot of Dead Copycats.” Included in the Mingus Dynasty album, the tune was Mingus’s way of recognizing the enormous impact of Parker on other saxophonists. Parker’s approach was so overwhelming that scores of horn players, alto saxophonists in particular, sought to copy it. Bird was the way to sound.

Mingus was making a point that cloneliness is not next to godliness. Still, learning by emulation is a longstanding hallmark of jazz–and, for that matter, of any discipline. Whether it’s a girl watching her mom bake cookies in the kitchen, an English major contemplating a Hemingway short story, or a trumpet player transcribing a Wynton Marsalis solo, every person learns by seeing–or hearing–and imitating how the masters do it.

Today, both in print and on the Internet, a huge array of transcribed solos testifies that the venerable tradition of emulating the jazz luminaries remains alive and well. Yet so, too, does a common objection voiced by novice musicians: “I don’t want to sound like another musician; I want to develop my own style.”

It’s an understandable concern, but is it a valid one? That depends, really, on the goals of the individual. Let’s put it this way: If you listen to a lot of Kenny Garrett, and if you take it upon yourself to transcribe a bunch of Kenny Garrett solos, and if you steep yourself in those Kenny Garrett solos, then chances are you will come out sounding an awful lot like Kenny Garrett.

Now, if that’s all you aspire to, then that’s where you’ll end up: as a Kenny Garrett clone. But if you desire to forge your own voice, then Kenny will simply become a part of your vocabulary, a vocabulary that includes other influences besides Kenny and increasingly reflects your personal explorations with melody, harmony, timbre, and nuance. You are an individual, after all, and the sheer force of your individuality will direct you toward your own sound and approach.

So don’t be afraid to go through the masters. Doing so is a part of how every jazz musician learns. It’s not the only part of the growth curve, but it is a foundational one: working the pre-existing language of jazz into your head and your hands so you can communicate meaningfully with your instrument. The point of copying Bird isn’t to play like Bird, but to move beyond Bird and play like yourself. And you will. If you want to, you will.

That’s all that need be said. You just need to trust the process–and, I might add, enjoy it. Don’t worry about arriving; just dig the journey, and recognize that your landscape is slowly changing with every step you take.

Practice hard, have fun, and keep at it!

If you enjoyed this article, click here to find lots more similar posts, including chops-building exercises, jazz theory, solo transcriptions, and video tutorials.

I Would Be a Sinner: Rich Lataille Alto Sax Solo Transcription

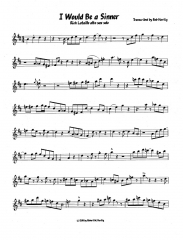
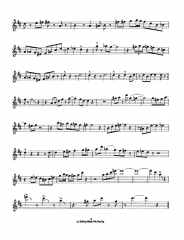
A couple years ago, while listening to WBLV (a wonderful West Michigan jazz radio station), I heard a tune by the band Roomful of Blues that put a smile on my face and set my insides to dancing. The title was “I Would Be a Sinner” from the CD Raisin’ a Ruckus, published in 2008 by Alligator Records. Predictably, I suppose, considering the name of the band, the tune was an F blues, and the alto sax solo by Rich Lataille was just perfect. I don’t know how else to describe it, and I’m not going to try too hard other than to say that Rich’s tone is beautiful, his technique is surgically clean, and his approach is passionate and smack on the money.

Here are all three choruses, transcribed for the alto sax. (Click on the images to enlarge them.) It probably needs no saying, but I’ll say it anyway: You’d do

well to pick up the CD, or at least download the tune on MP3. I’ve notated some of the important slurs and articulations, but I’ve by no means tried to capture all of them, and you’ll want to hear them. You’ll also want to check out the interplay between the alto and the bari sax in the second chorus, with the addition of other instruments in the third chorus. The counterpoint hearkens back to Dixieland bands in spirit, though the style is obviously different.

And that’s all I need say, other than that this is a great tune, and I hope you’ll enjoy playing it and listening to it as much as I do!

One for Daddy-O: A Cannonball Adderley Solo Transcription

If you’re an alto saxophonist, at some point you’re going to have to go through Cannonball Adderley just as surely as you’ve got to deal with Charlie Parker. Cannon’s buttery tone, prodigious technique, and ability to consistently and flawlessly deliver solos of pristine inventiveness make him a foundation stone of jazz saxophone.

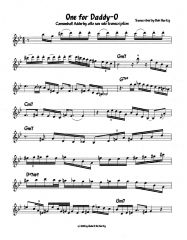
The transcription on this page showcases Cannon playing on “One for Daddy-O,” a Bb minor blues with a head written by his brother, trumpeter Nat Adderley. The feel is a cool, casual shuffle, with no one in any hurry to get

anywhere. Even as Cannon cooks with passion and dexterity for four bars in double-time, he somehow manages to convey a laid-back mood that makes it sound as if he’s lying in a hammock and will return to sipping his iced tea as soon as he’s finished.

“One for Daddy-O” is one of the tunes in the classic Adderley quintet album Something Else. When you give the CD a listen, check out the call-and-response between horns and piano in the head. Points of interest in Cannon’s solo include:
• Use of the G and D Phrygian dominant scales (mode five of the harmonic minor scale)–ex. bar 6, or the fourth bar into the first full 12-bar form; and bars 28 and 36, or the second and tenth bars of the third chorus.

• Rhythmic variety within an overall 16th-note double-time framework. There are places in this solo where you can hear Cannonball stretching the time like taffy, now speeding up, now slowing down, yet never failing to convey a sense of the underlying pulse. The only thing Cannon doesn’t do with time is lose it, even for an instant. It has been a challenge for me to try to capture in notation what he’s doing in some spots!

• Recurrent ideas–motifs, if you wish–that help to unify the solo. The walkdown to low Bb in bar 4 is a good example; you’ll find variations of it reiterated throughout the solo.

But enough of me talking. Time to get on to the solo. Click on the images on this page to enlarge them. And if you’d like to view more solo transcriptions as well as articles, video tutorials, and technical exercises, you’ll find them here.

I should add that I’m still not certain I’ve properly captured the rhythm of the very last two or three bars where Cannon winds things up. If it’s not spot-on, it’s close, and further listening will tell me whether I need to tweak that section or leave it be. Either way, I’ll remove this last paragraph once that final snippet is taken care of.  Everything else checks out. Have fun with it!