A Charlie Parker Lick Around the Cycle of Fifths

Okay, campers, listen up: Uncle Bob says it’s time again for another great sax lick. So gather round the campfire with your saxophones, and grease your fingers to keep them from igniting, because this lick comes to you from the immortal Bird. That’s right, Charlie Parker, the indisputable emperor of the alto sax–not merely a luminary of jazz, but one of its incendiaries. It pays to light your tinder with Bird’s flame, and this exercise will help you to do so. Click on the thumbnail to enlarge it to readable size.

bird_lick_cycle_of_fifthsThe lick comes from the first bridge section of Parker’s solo on “Thriving from a Riff,” which is one of the myriad contrafacts based on the changes to “I Got Rhythm” that were written back in the bebop era. An alternate and perhaps better-known name for this particular tune is “Anthropology.” Same head, same changes, just a different title.

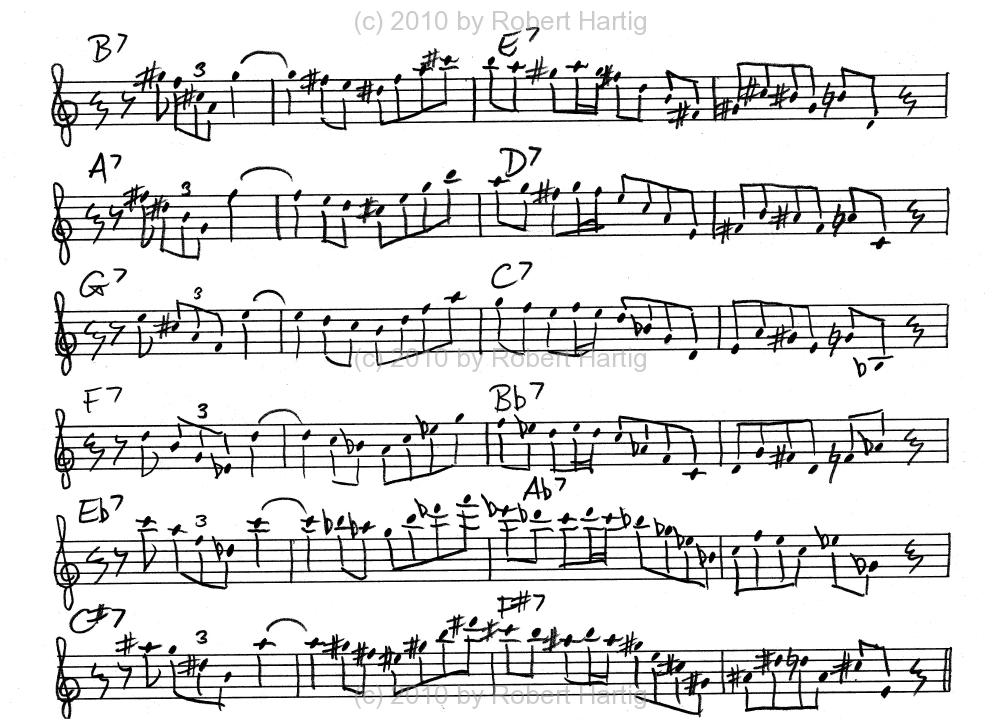
While a number of variations exist on the chord changes to the Rhythm bridge section, the basic progression, and arguably the most frequently used, is four dominant seventh chords moving around the circle of fifths in two-bar increments. Since the cycle of dominants is the foundation for the Rhythm bridge, extending a lick written over the bridge so that it covers all twelve keys is a great way to develop fluency in every key. That’s the premise of the exercise on this page.

Note that I’ve done only half your work for you. Once you’ve mastered the written material, you’ll need to transpose the lick so that it starts on E7 instead of B7, and work your way through the remaining transpositions.

Parker played Rhythm changes in a number of keys, but the standard key of concert Bb is the one he used most often, and it’s the one that “Thriving from a Riff” was written in. It puts the Eb alto sax in the key of G, with B7 being the first chord of the bridge section. For Bb instruments such as tenor sax, soprano sax, and trumpet, the first chord will be E7. But for purposes of practicing the cycle of fifths, it really doesn’t matter which chord you start with–it’s all good, and it’ll all take you around the complete cycle through all twelve keys, which is the purpose of this exercise.

It’s de rigeur these days to offer analyses of transcribed solos that are so exacting they could split the hairs on a fly’s behind. I admire the insight and effort that go into such exhaustive examinations of an artist’s work, but I frankly find them a bit overwhelming. I do, however, appreciate having points of particular interest spotlighted, and I will offer a few such highlights here.

The opening figure, an arpeggio descending from the thirteenth of the chord, superimposes an A+(#7) over the B7. Bird couldn’t have more effectively avoided playing the basic triad tones. Note his use of the flatted fifth, creating a Lydian sonority. The parent scale at this point is a B Lydian dominant scale, but it’s only a temporary application. In the following bar, Parker clearly defines the B7 and his approach becomes purely diatonic up to bar 4, where he injects a touch of chromaticism in the form of a passing tone. Look closely and you’ll see a hidden chromatic line descending from the note D in bar 3 through C# and B# in bar four and landing on the note B. The final two notes, B and D, are chord tones, the fifth and flat seventh of the E7.

So much for the fancy analytical stuff. If it helps you, fantastic; if it just loses you, don’t worry about it. The main thing is for you to get the exercise drilled into your fingers and your ears. In other words, make a point of memorizing it. Doing so won’t make another Charlie Parker out of you, but it will make you a better player.

That’s the goal, right, campers? You bet it is. Uncle Bob has spoken. Now get your little butts back to your cabins–you’ve got some practicing to do.

Dominant Seven Flat Nine Exercise on the Cycle of Fifths

If you want to develop comfort and ease with changing keys swiftly, then practice patterns on the circle of fifths. In particular, work on dominant seventh chords; doing so will help you to develop facility in voice leading from the seventh of one chord to the third of the next, and vice versa.

The exercise on this page is one of countless possible dominant seventh patterns. I like it because it brackets the chord root with the flatted ninth and raised seventh, then descends from the root through the lowered seventh to the third of the ensuing chord. Bottom line: you get a nice combination of color tones and harmonic motion. Click on the image to enlarge it.

This is a pretty straightforward exercise, and I don’t think I need to say anything more other than, memorize it, apply it to the full range of your instrument, and have fun!

Oh, yeah…and, check out my jazz page for more exercises, solo transcriptions, and articles of interest to jazz musicians.

Key Saturation: Mastering the Hard Keys on Your Sax

Tonight I practiced my saxophone for the first time since I pulled my back muscles this past Monday. It feels great to be able to walk freely again, and this evening it felt doubly great to hop into my car, head out to my beloved railroad tracks, and woodshed my horn for several solid hours.

Much of my time was spent working on the key of F#. That’s one of my favorite, time-tested approaches in practicing: to periodically pick a single key or tone center and saturate myself in it. By “saturate,” I mean hitting the key from every possible angle: running patterns on the scale. Drilling myself on the key’s dominant chord, including alterations and substitutes. Working chromaticism into the diatonic framework. Transposing and memorizing great jazz players’ solos. So on and so forth.

All of us practice key saturation to some extent simply by default. We don’t think of what we’re doing in those terms, but it’s the reason why we commonly become proficient in keys such as concert Bb, F, Eb, and C. We naturally spend lots of time working on those keys because they’re the ones that a great deal of jazz is written in. We think of them as the easy keys–easy because, we tell ourselves, they have fewer sharps or flats. But the real reason they’re easy is because we’ve practiced them enough to become conversant in them.

By that same reasoning, the “hard” keys–keys such as concert E, A, D, and F#–are hard not because they have lots of sharps or flats, but because we haven’t spent any real time getting intimately familiar with them.

The truth is, “hard” is just a mindset. There are no hard keys; there are only unpracticed keys. There are no difficult scales, only unpracticed ones.

That’s why it pays to pick a key or tone center you’re unfamiliar with every now and then, and spend several practice sessions saturating yourself in it. If you’ve never done so, give it a try.

If you’re an alto player, for instance, how well do you get around in the alto key of Ab? Not too hot? Then why not devote part of your next session to bombarding that key. Pick a solo transcription you know well and start learning it in Ab. Ditto a few tunes. Hash out diads and arpeggios, starting with the basics and working in bracketing and chromaticism. Wrap your fingers around a few ii-V7-I’s. And don’t forget your bebop scales.

Mastering a key takes time and consistency, but the saturation approach will get you there if you stick with it. And you just may find, as I’ve found, that key saturation can become addictive as those hard keys become less difficult and a lot more enjoyable.

Sixth Interval Exercises for Jazz Improvisation

Two posts ago, I talked about the use of the sixth as a sort of sweetening agent in improvised solos. If you haven’t yet done so, I recommend that you read that article before proceeding with the following exercises. It’s always good to understand a little about the whys and wherefores of what you’re doing, particularly when it comes to connecting saxophone technique with jazz improvisation.

One thing I didn’t mention in the previous post, and an important point at that, is the angularity that sixths bring to a musical line. Broad interval that they are, sixths are by definition intensely angular, and as such provide a colorful and interesting way to break up a linear flow.

The three exercises on this page are all based on the C major scale. (Click on the image to enlarge it.) The first exercise features basic sixth diads, moving up and then back down an octave.

The second exercise begins on the third of the C major scale (the note E) and moves up a sixth to the tonic C, thereby strongly implying the C major chord and establishing the key center. The exercise moves downward from there, incorporating the added color of passing tones and chromatic lower neighbors.

Exercise three, ascending an octave, approaches each lower note of the diads with a chromatic lower neighbor. While the result is a series of three-note groups, I’ve written the exercise in eighth notes rather than triplets to create a syncopated effect.

Consider each written exercise to be just the abbreviated form of what you actually need to practice. You should take all three exercises up and down through the entire range of your saxophone. You’re smart enough to figure out the missing pieces for yourself, and you should do so.

I suggest that you start by picking one pattern and memorizing it in all twelve keys, beginning with the first exercise. Then proceed to the next pattern and do likewise.

Yes, I know–I’m a drill sergeant and you hate me. But I promise you, all that hard work will pay big dividends with time. One of these days, you’ll thank me. Really. “Thank you, Bob,” you’ll say. Until then, my ego is tough enough to handle the lack of love.

Sweeten Your Sax Solos with Sixths

Just a little “S” alliteration to brighten your day. Think you can say the above headline ten times, fast?

It’s true, though. If you want to sweeten up your improvised solos, then get familiar with the interval of the sixth. There’s none sweeter.

Practice the sixth as an interval study on all your major scales, up and down. And think about its application. Remember that the sixth is the inversion of the third, and it possesses the opposite quality of its corresponding third. If the third is a major third, then when you invert it, you’ll get a minor sixth. And vice versa: a minor third inverted becomes a major sixth.

A standard and particularly pleasing use of the sixth is to jump from the third of the tonic chord up to its root at the end of a passage. But that’s just for starters; there are many ways to incorporate the sixth into your improvised solos. And sequences work beautifully, which is good incentive to spend time with diatonic sixth studies on major scales, as I’ve recommended above.

The sixth is particularly nice when you approach it with neighboring tones and passing tones. I may put together some exercises to get you started exploring the possibilities, so stay tuned. The sixth is a really handy interval to have in your arsenal as a sax player, and it’s well worth taking the time required to wrap your fingers around it.

Saxophone Mouthpiece Exercise (a Dignified Term for Screwing Around Making Weird Noises)

I stumbled upon the following saxophone mouthpiece exercise long before I really knew how to play the sax. Back when I was in high school, I needed some kind of trick to cover my butt when I was jamming with other musicians–typically rock bands in those days–and needed to disguise the fact that I didn’t have a clue what I was doing. One evening at a kegger, having exhausted my meager bag of licks, I got the sudden inspiration to pull my mouthpiece off of my horn and play it by itself. The idea certainly commanded attention, captivating my listeners for a good five seconds, though I’m not sure it was the most musical extravaganza they had ever experienced.

Anyway, many years down the road, I still make occasional use of the sax mouthpiece exercise. I’m not sure what else to call it, other than screwing around with the mouthpiece making sounds like a goose gargling. But in all seriousness, I believe you can find some value in the technique, both as a creative tool and as a means of sensitizing your oral chamber for purposes of tone color and pitch control.

The exercise is simple: cup your hands together to form a sort of pouch, as in the first picture (click on it to enlarge it). Then blow into the mouthpiece. You can then “play” the piece by opening and closing one hand, as in the second photo. The result is a sort of demented warble that sounds like some kind of marshland bird on an acid trip.

Them’s the basics, but of course, you’ll want to experiment. You can actually control the pitch with your hand, and you’ll also want to see what kinds of sounds and pitch-bending you can do by adjusting your embouchure. The point is to explore the colors you can generate using just your mouthpiece, your hands, and your embouchure and air column. You can get some surprisingly expressive effects. In my “Eyes on Mars” album with Ric Troll, I performed an entire piece using this technique. Is it music? I guess that depends on your philosophy of music, and frankly, I wasn’t thinking about the question at the time. I was just having fun trying something different and creative. You know–being a kid.

Give the saxophone mouthpiece exercise a try and see what you think. And check out my jazz page for more tips, technical exercises, and solo transcriptions to keep you occupied.

How to Practice the Saxophone: Four Key Principles That Can Help You Advance

What does it take to develop as a jazz saxophonist–or, for that matter, as any kind of instrumentalist?

Practice.

Right, I guess we all know that. But there is practice, and then there is effective practice. Practice that makes the best use of the time you’re investing. Practice which a year from now will have produced a year’s worth of results rather than a month’s worth of plodding the treadmill twelve times over.

Two things are paramount for effective saxophone woodshedding: what you practice and how you practice. In previous posts and on my jazz page, I’ve provided plenty of material that addresses the “what” part of that equation. In this article, I’m going to talk a bit about the “how” as it pertains to technical development.

Having spent time contemplating the things that have contributed to my own growth as a sax player, I’ve identified four key principles that I believe are important for developing technical proficiency. They are:

Isolate

Repeat

Connect

Memorize

These four principles work together to help you transition from the initial, heavily intellectual process that comes as you tackle new musical material, to a more intuitive approach that develops as you spend time mastering that material and making it your own.

Each of the principles could easily be an article in itself, so I’m not going to tackle them in depth. Right now, I just want to introduce you to the concepts.

Isolate

Whether you’re learning a new scale, practicing patterns, hashing out a lick, moving around the circle of fifths, or memorizing a Charlie Parker solo, the way to approach musical material is in increments.

Think of how you eat your food. You’d never stick an entire steak in your mouth and try to swallow it whole. (You wouldn’t, would you?) No, you cut off manageable, bite-size pieces which you take your time to chew. The same idea applies to working on music: bite-size is best.

Pick groups of notes and repeat them till they lay well under your fingers. In particular, isolate problem areas and focus on them, oiling them with repetition until they’re working smoothly. Work out which alternate fingerings work best in a given situation. If you’re playing in the key of F#, for example, you may find yourself using the bis, one-four, and side fingerings for A# almost consecutively as the context for your approach to the note A# changes.

START SLOW. Concentrate on how evenly you connect the notes, not how fast you can play them. Once you’re playing a note group accurately, comfortably, and consistently, then speed up a notch or two, and continue to increase your speed till you’re playing at high velocity. If you find yourself hitting a speed where you start fumbling and misfiring, then slow down. The point isn’t to play fast, but to play masterfully. Fast will follow.

Repeat

Repetition is woven into the first principle of isolation. You isolate a group of notes or even just two notes in order to repeat, repeat, repeat them, often enough to drill them into your muscle memory. Since I’ve already written a post on repetition, there’s no need for me to–ahem–repeat what I’ve already said. Go read the article.

Connect

Once you’re playing a group of notes fluently, add a note or two in front of it or behind it. Or work on the next group of notes until you’re playing it as fluently as you were playing the first, then connect the two groups.

In the process of focusing on the second group, you may find that you’ve lost a bit of ground with the first group. That’s okay. Go back to the first group and smooth it out. The point is, you work on small units of material, then you work on connecting them to create something larger–to which you will, in turn, connect still more material.

Often you’ll encounter a sticking point between the last note or two in one note group and the first couple of notes in the group that follows. That juncture should become a new area to isolate and work out.

If this sounds like a tedious process, it can be, but it’s also a very profitable one. And not all groups of notes carry equal weight. Some come more easily; others are more challenging. Run toward the challenges, not from them.

Memorize

As long as you’re depending on the paper to tell you what to play, the music you’re working on isn’t really yours. I’m not referring to extended pieces of music where a chart is mandatory, but to scales, licks, patterns…to the building blocks of technique and the language of jazz improvisation. Memorization is an indispensable part of the jazz saxophonist’s toolkit.

The whole point of all this isolating, repeating, and connecting is to move the music off the printed page and into your head and your fingers. So at the very beginning of the process, make a point of looking away from the sheet music. Consult it as freely as you need to, but remember that your goal is to wean yourself from it. When you’re in mid-flight on the bridge to “Cherokee” on your alto sax, you had better be thoroughly acquainted with the keys of Ab, F#, E, and D, because the rhythm section is not going to pause while you look them up in your Larry Teal workbook.

Memorize everything. Tunes. Chord changes. Scales, arpeggios, circular root movements…everything you can possibly cram into your gray matter and drill by repetition into your muscle memory.

One last thing…

Think about what you’re doing. Engage your mind in the process. If you’re working on a digital pattern, consider not just what you’re playing, but also how you can use it with various chords or chord progressions. Think about how you might switch up the rhythm of a lick to create a different effect. You can build all the saxophone technique you want to, but ultimately it’s your brain, not your horn, that converts the raw material into actual music.

That’s it for today. If you enjoyed this post and would like to read more helpful articles on playing the sax, or perhaps find a jazz sax solo transcription to hash out, see my jazz page.

Practice hard–and have fun!

Cannonball Adderley Alto Sax Solo on “Hurricane Connie”

Here is a saxophone solo transcription of Cannonball Adderley demolishing the changes to “I Got Rhythm” in his typical, incendiary style. “Hurricane Connie” is the tune, and it’s a an alto saxophone tour de force for Cannon. Click on the images to enlarge them.

In an interview between Tim Price and Nat Adderley in Tim’s book of solo transcriptions, The Julian Cannonball Adderley Collection, Nat had this to

say of his brother: “Cannon could really play the saxophone so well that it was never a problem for him to play something that he heard. Whatever he heard in his head, he could execute.”

Undoubtedly. Cannonball heard a lot in his head, and it all came out with remarkable cleanness. His technique was impeccable but always warm and human; precise but never mechanical. “Hurricane Connie” is a prime example. Get this one under your fingers and watch your own technique loosen up.

Ghosted Notes on the Saxophone

When you’ve been playing the saxophone for a long time, it’s easy to forget how certain techniques that have become an organic part of your playing once were mysteries to you. So it was for me with ghosted notes–aka ghost notes, aka ghost tones–back in my college days. I heard certain sax players punctuating their solos with notes treated with a sudden reduction in sound volume that made it seem as if they had been swallowed. It was a very cool effect, but I didn’t know what it was called, and darned if I could figure out how to duplicate it.  One thing was clear: it involved something other than merely adjusting my airstream.

I finally asked fellow alto man Tom Stansell, who used the technique with excellent effect, what it was he was doing and how he did it. Tom quickly filled me in, and the mystery that had been eluding me turned out to be no mystery after all. Within a few minutes during my next practice session, I had a pretty good handle on the technique.

If you’ve never ghosted a note on the sax before, then here’s your opportunity to learn how. What Tom passed on to me, I now pass on to you.

How to ghost a note on the saxophone

Ghosting a note on the sax is simply a matter of tongue placement during articulation. In normal articulation, you separate notes by applying your tongue to the reed dead on, temporarily cutting off air from the mouthpiece and preventing the reed from vibrating. But by applying your tongue to only one corner or side of the reed while maintaining your airflow, you effectively dampen just a part of the reed while allowing the rest of it to vibrate.

That’s all there is to it.

Repeat: to ghost a note, simply touch just a side or corner of the reed with your tongue.

Of course, you’ll refine the technique and personalize your application of it over time, but the above is all you need to get started.

Now the next time you’re playing through a chart and you come across a note or group of notes enclosed in parentheses–the standard notation for ghosting–you’ll know how to treat it.

Unlike circular breathing or double tonguing, note ghosting offers a rare opportunity for instant gratification in a saxophonist’s learning curve, and it’s a very effective tool to have in your musical toolkit. You’ll love how a handful of well-placed ghost notes adds interest and character to your playing.

That’s all, folks. Be sure to check out my jazz page for more helpful articles and saxophone solo transcriptions.

Lynn’s Grins: A Charles McPherson Alto Sax Solo Transcription

Ready for another saxophone solo transcription? “Lynn’s Grins” by alto saxophonist Charles McPherson is one of my favorites. It’s a concert C blues (alto key of A) at a medium-fast tempo, and it features McPherson in full cry, showing the listening world that he knows a thing or two about bebop. (Click on the images to enlarge them.)

From his simple opening statement outlining the tonic triad, McPherson plunges headlong into a millrace of ideas, toying at times with outside colors but always staying within the basic framework of the parent key.

There’s plenty to pick up on from this solo, and the best way to do so is by getting to work on it. What are you waiting for? Get cracking!