Pentatonic Licks with the Altered Dominant Chord

What? Another Stormhorn post so soon?

Yes, I’m on a roll. This post is a continuation from the last post, which offered a couple practical exercises on angular playing using pentatonic scales. As I promised in that post, this next one explores the relationship between pentatonics and altered dominant harmony. But as with the previous post, my objective here is not to go all theoretical on you but to offer a few practical exercises for developing facility with pentatonics in the V7 alt context.

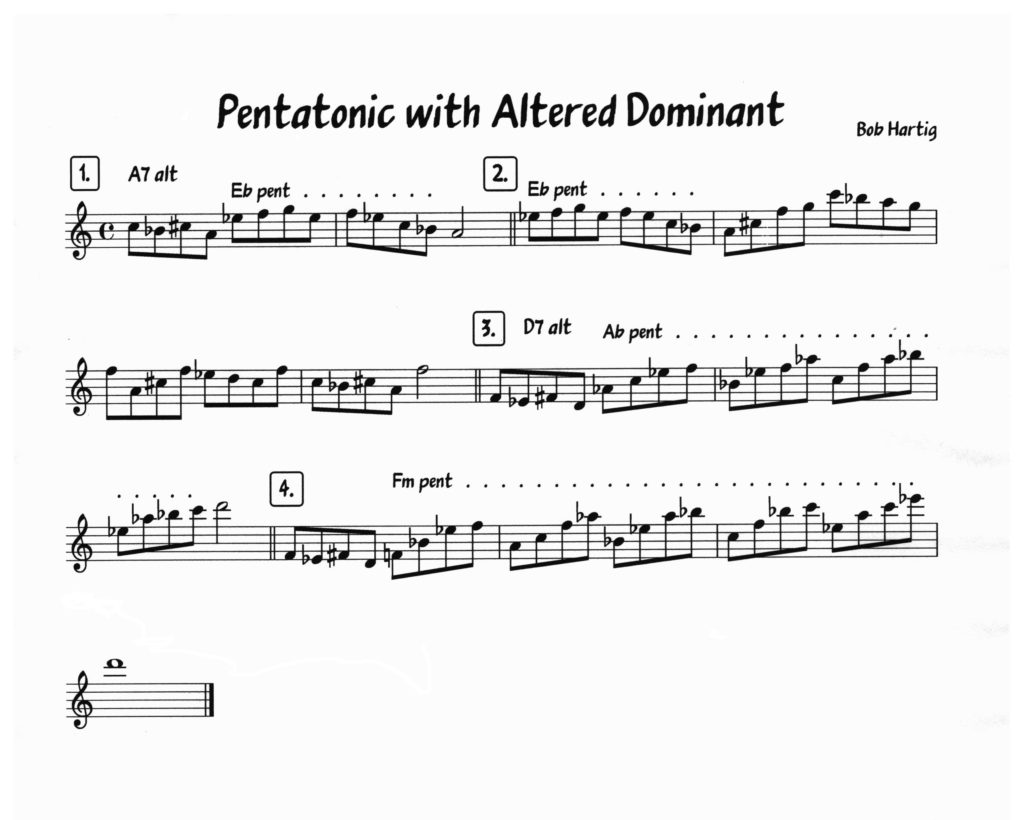
Still, for these exercises to make sense, a bit of theory is necessary. By altered dominant, I’m referring to the V+7(#9) chord, otherwise known as the V7 alt. Jamey Aebersold long ago introduced the simpler spelling V7+9, and since that’s the one I’m used to and it’s convenient, that’s the spelling I’ll use. The chord is called “altered” because very little about it–just the root, third, and flat seventh–is unaltered. The fourth and fifth are both raised a half step, and both sharp and flat ninths are included.

The scale of choice for the V7+9 chord is the diminished whole tone scale (dim WT). It is actually a mode of the melodic minor scale built on its seventh degree. For example, a B dim WT is built off the C melodic minor scale, thus: B, C, D, Eb, F, G, A, and octave.

Within the dim WT scale lies a single major pentatonic scale built on the scale’s tritone (augmented fourth).* So, again using the B dim WT as our model, the resident pentatonic is F: F, G, A, C, D. These notes constitute all the scale’s altered tone plus the flat seventh, thus: +4, +5, b7, b9, #9.

For me, the question is, how do I relate the sound of a major pentatonic scale to an altered dominant whose root is a tritone away? It’s not a sound that sticks readily to my ear.

The four exercises shown here–licks, really–are designed to help you drill your fingers and ears on the dominant chord and corelate them to the pentatonic scale. To my thinking, at least at this stage in my development, I want to resolve the pentatonic scale to one of the basic chord tones, and I want to have those chord tones–the root, third, augmented fifth, and flat seventh, always in mind.

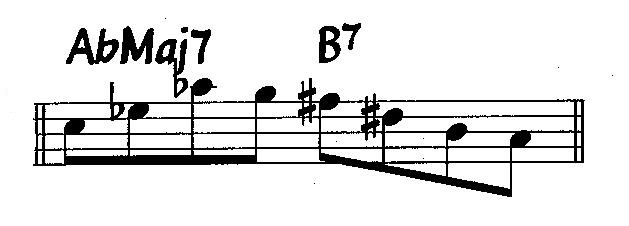
To that end, the first exercise introduces a motif I also use in the rest of the exercises. It focuses on the lower part of an A7+9 chord, starting with the sharp and flat ninths and then establishing the third and the root. Following that little four-note figure is a well-known pentatonic lick based on the tritone, Eb. Finally, the exercise resolves to the root of the chord.

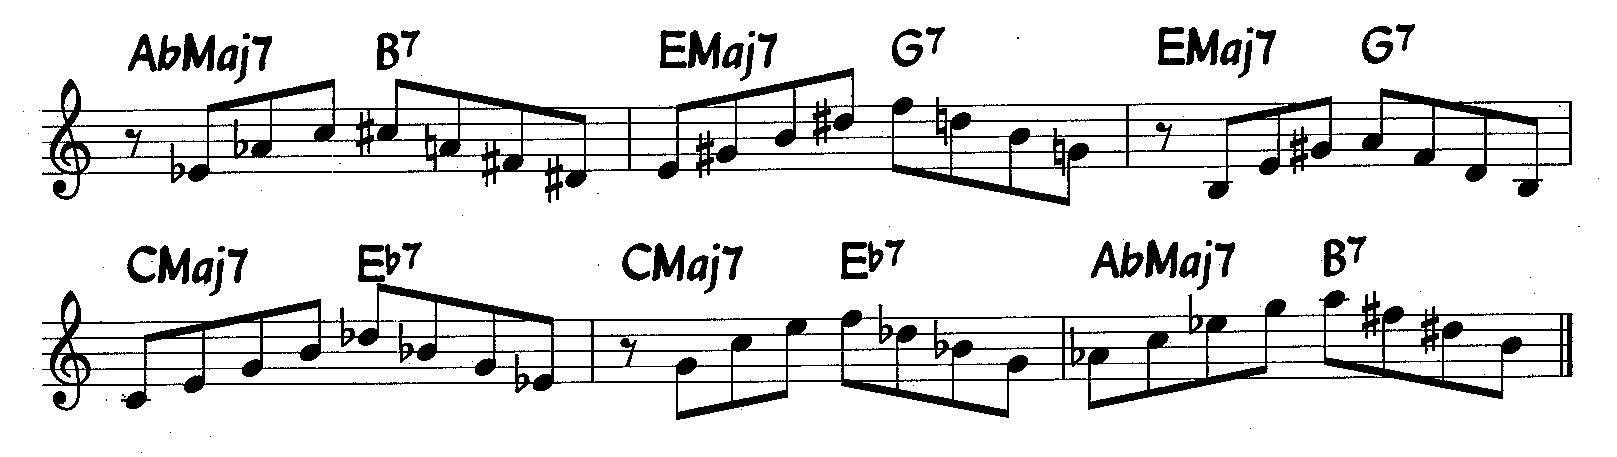
Exercise two starts with the pentatonic lick, then arpeggiates the A7+9 and explores the dim WT more fully, and concludes with the four-note motif, described above, resolving to the sharp five of the chord.

The third and fourth exercises, now focusing on the D7+9, begin with the motif, then move into more angular versions of the pentatonic scale. Note that in the fourth exercise, I’ve opted to focus on the F minor pentatonic. It is the relative minor of the Ab major, so none of the notes involved have changed; it’s just a different way of thinking about the pentatonic scale.

I recommend that you spend some time with each exercise in just the key it’s written in, playing it slowly and trying the absorb the sound of the pentatonic scale in relation to the sound of its parent dim WT scale and the V+7 chord. Then work at memorizing each lick in all twelve keys.

That’s it. They rest is up to you. I wish you fun and fruitful practicing.

ERRATUM: In exercise four, the first note in the second bar should be an Ab, not an A natural. With this post finally put to bed, I don’t have the patience to spend the time required (more than you’d believe) to add a lousy little flat. So kindly make the adjustment mentally.

___________________

* You could argue that there are other pentatonics that also fit the altered dominant chord. True, but they’re all modified in one way or another. The only natural major pentatonic that derives from the diminished whole tone scale is the one I’ve described.

How to Practice the Giant Steps Cycle: Video Tutorial and Supplementary Material

My preoccupation with John Coltrane’s tune “Giant Steps” now ebbs, now flows, but always continues. I’m not the most fabulous alto sax man who has ever played the changes, certainly not in the league of Kenny Garrett, but I have my own approach, which I strive to make less digital and more lyrical. I’ve even had the temerity to write a book of licks and patterns on “Giant Steps” titled The Giant Steps Scratch Pad, available for instruments of every key.

In the following video tutorial, I share a couple approaches to practicing the Giant Steps cycle that I have found profitable in my own practice sessions. The video begins with a bit of theory; however, the theory behind “Giant Steps” is more than adequately covered elsewhere in greater depth, as in this excellent article by Dan Adler, and it isn’t the thrust of the tutorial. Rather, I address a more pragmatic concern: How do you wrap your fingers around the Giant Steps cycle? The tips I share in the tutorial certainly aren’t the only way you can or should tackle the cycle, but I think you’ll find them helpful. Briefly, I explain how to run both a one-bar pattern and a more extensive two-bar lick through the cycle.

The two patterns used in the video were taken from The Giant Steps Scratch Pad. For your convenience, I’m supplying them for you here. Note that these excerpts are from the Eb edition, suitable for alto and baritone saxophonists; if you play a C, Bb, or bass clef instrument, you’ll need to transpose (though editions of my book are available in your key). Click on the images to enlarge them.

One-bar pattern:

002


One-bar pattern through the cycle:
003


Two-bar lick:
004


Two-bar lick through all three keys of the cycle:
GS 1-Bar Pattern


And now, here is the video. It’s obviously a homespun effort, so please bear with its flaws. I haven’t figured out how to read from my PowerPoint notes and still look directly at the camera, and as for that stupid deer fly that lands on my forehead while I’m signing off and roams around like an astronaut exploring the lunar surface, I wasn’t aware of it till I got home and viewed the clip. You think I’m going to do a redo just for that? It’s part of filming outdoors: mosquitoes setting up drilling operations on my nice, pink flesh, deer flies exploring my noggin—I deal with it and you can too.

Go ahead and chuckle. But if you’re a jazz improviser who’s tackling “Giant Steps,” then I think you’ll nevertheless find this tutorial worth your while.


Ornithology: A Charlie Parker Alto Sax Solo Transcription

OrnithologyThe beboppers of the 1940s and 1950s advanced the use of contrafacts,* and the godfather of bebop, alto saxophonist Charlie Parker, used them liberally. After the many tunes he wrote over the chord changes to “I Got Rhythm,” the contrafact he probably recorded most was the tune “Ornithology,” which utilizes the changes to the old standard, “How High the Moon.”

I have no idea exactly how many recordings exist of Bird holding forth on “Ornithology.” I only know that there are lots. The tune was clearly a favorite vehicle for Parker, and the transcription shown here captures his first 32 bars of an extended flight. I hope to transcribe the rest of it in time, but the process keeps getting interrupted by other priorities, so for now at least, I thought I’d share this much of Bird’s solo with you. It’s plenty ’nuff to whet your chops on.

Charlie Parker not only had a phenomenal technique, but an equally amazing melodic concept. Both are on display here. Just click on the image and enjoy soaring with Bird.

If you enjoyed this post, visit my Jazz Theory, Technique & Solo Transcriptions for many more transcriptions, licks and technical exercises, and educational articles on jazz.

—————-

* Contrafacts are new melodies set to the harmonies of preexisting tunes.

Diminished Whole-Tone Lick around the Cycle of Fifths

Tonight’s post is low on text but high in content. Click on the image to enlarge it, then print it out and take it with you to your next practice session and start adding a nice new lick to your diminished whole-tone collection.

Not much to say about this little gem that you can’t figure out for yourself, but here are a few points of interest:

    ♦  The lick begins and ends on the flat seventh of the V+7(#9) chord.
    ♦  Beats two and three highlight the major triad that’s formed off of the raised fifth of the parent chord. For example, if you’re playing a D+7(#9), the raised fifth is A#–or Bb, enharmonically–and beats two and three will accentuate an A# (Bb) major triad. You can look at it as chord superimposition.

    ♦  The last beat emphasizes the two “identity tones” of the dominant chord, leaping a tritone from its third to its lowered seventh.

That’s all. Have fun with it! And if you enjoyed this post, check out my large and ever-growing library of jazz theory, technique, and solo transcriptions.

Fourth Patterns: Three Exercises to Build Your Technique

This post begins with a slice of my life. Blogs are personal things, or have the capacity to be if we let them. Sometimes I choose to do so in a way that goes beyond the realm of storms and music to other aspects of my world. Today, the pressures of that world have been getting me down. In the face of Michigan’s gnarly economy, the bills have been coming in with a consistency that the amount of business I need in order to pay them has not.  As a self-employed copywriter and marketing copyeditor, I’m grateful for every project that I get. Still, as anyone who has felt the bite of this recession can tell you, sometimes it’s hard to stay upbeat. I need more marketing clients. Yoo-hoo…anyone…?

Shameless, aren’t I. But…I’ve learned–or rather, I continue to learn daily–to thank the Lord for small but important glints of progress. One of them lately has been with my book of licks and patterns for Coltrane changes, The Giant Steps Scratch Pad. A number of you have been good enough to buy it–enough of you over this past month in particular that I think the book may be starting to slowly catch on. It was a labor of love, and I hope you’re finding it to be every bit as useful as I envisioned it would be. If you feel inclined to share your experience with it so far, by all means drop a comment. And if you like the book, please spread the word.

Okay, enough of this self-indulgent stuff. August has been a busy month for me, occupied with family and, last weekend, with getting my first and probably last taste of a hurricane as Irene slammed through North Carolina. That’s material for another post soon to come. Overall, in the midst of my preoccupations, I haven’t been updating this blog as often as I normally do. So today, I’m back for you jazz musicianly sorts with an exercise on fourth patterns. Three exercises, actually, with the latter two being variations of the first. Click on the image below to enlarge it.

Note that these patterns cycle downward not by the usual root movement of a perfect fifth, but by perfect fourths. Why is that, you ask. Because I like how it sounds, and you will, too.

These patterns can be used in a number of ways. Since they’re closely related to the pentatonic scale–pick any three adjacent patterns, crunch the notes together, and you’ll have a pentatonic–you can use them as you would pentatonic scales.

For that matter, you can use as many as five of these patterns in succession within a given key and remain diatonic to the key. The fifth pattern will fill in the last blank, furnishing you with all seven notes in that key. For example, the first two-and-a-half bars of the exercise are all diatonic to the key of C major.

From there, the harmonic applications can get as sophisticated as you care to go with them. I’ll let you hash out that part. My mission here is simply to give you something to grease your technique with. Have fun! And if you enjoy this post, check out my many more helpful exercises, transcriptions, and articles for jazz improvisers.