Tips on Jazz Guitar for Beginners–Guest Post by Marc-Andre Seguin

Greetings, friends! My postings in Stormhorn are admittedly sporadic these days, but this blog is still very much alive. Storm chasing this year has been nonexistent for me, but that’s no surprise; it has been a lousy storm season for chasers across the board, even for those who live in Tornado Alley. But the musical side of things is going strong, and I’ve got a few practical ideas to share about pentatonic scales, altered scales, and their relationship. I just need to make the time to transcribe them and put them in print.

Guitar instructor Marc-Andre Seguin, however, has got some perspectives that are ready at hand to share. Perspectives from instrumentalists other than saxophonists such as I are most welcome; we can all learn from each other, and beginning jazz instrumentalists of every stripe can profit from Marc. His bio follows at the end, so I’ll spare you a lengthier introduction and hand the microphone over to him.

Tips on Jazz Guitar for Beginners

By Marc-Andre Seguin

Starting out on jazz guitar isn’t easy. The intricacies of the jazz language can seem insurmountable without direction. Here are a few tips to get you started on the path of jazz guitar mastery.

Listen

Without even picking up the guitar, it’s important to constantly listen to jazz recordings. Simply by hearing this style, many concepts are internalized, such as rhythm, phrasing, harmony and improvisation. Great recordings are available from legendary guitarists such as Joe Pass, Wes Montgomery, Kenny Burrell, to name just a few, and they should be constantly playing in your ears.

But don’t stop at guitarists. It’s crucial to listen to other instruments as well. John Coltrane, Charlie Parker, Miles Davis, Bill Evans, Thelonious Monk, and others have made immense contributions to the style. So vary your listening habits to include these and other major contributors to the language.

Practice

Playing jazz involves muscle memory and good reflexes, and these are cultivated in the shed. Although the genre is often intellectual, most improvisations rely on unconscious movements to make the connection with our inner ear. It’s important to have a solid foundation on which to build our musical messages. Following are some simple approaches to practicing chords and scales.

Chords

There’s a simple approach to mastering the many voicings for guitar: start small and build up your chordal database little by little. Root forms of chords are the building blocks to more complex and extended variations. These forms can be learned starting from the sixth and fifth strings and, once memorized, can be practiced by reading out the chords of a standard.

There are four main chord types to learn: the major 7, dominant 7, minor 7, and minor 7b5. With these barebones varieties, you’ll be able to play most of the jazz repertoire.

Scales

Once you’ve memorized chords, you’re ready to apply the correct scales over them. Scales require a relatively large investment of time to learn, since there are multiple positions of the same scale all along the neck. The easiest approach is to methodically learn each scale and keep it in your fingers for an extended period until it becomes second nature.

Learn

To progress quickly, constantly learn new material. The more you explore the genre, the more fluent you will become in its language. Here are aspects in which you should invest your time.

Standards

Work at memorizing the hundreds of tunes that make up the standard repertoire of jazz musicians. Most are older, popular tunes from the “American songbook” that jazz instrumentalists have adapted to fuel improvisations. Learning them is not as daunting as it sounds; many are contrafacts: new melodies played over the chord changes of a popular song. “I Got Rhythm” is a classic example: many jazz standards use “rhythm changes” (as jazz musicians call them) for their harmony. Others are based on the blues grid, and that’s where I suggest you start. The simple heads (melodies) and chords of tunes like “C Jam Blues” and “Blue Monk” are perfect for beginning improvisers. And blues in minor keys provide a good introduction to other types of chords. A few other well-known standards that most beginners explore first are “Autumn Leaves,” “All the Things You Are,” “Blue Bossa,” and “Summertime”—and the list goes on. Learn the melody and the chord changes, then start improvising over the chords.

Licks

A classic way to absorb jazz vocabulary is to learn different licks from your favorite players. The classic, extremely profitable approach is to listen to their recordings, pick a lick you like, and then work at playing it yourself till you’ve got it right. A simpler way is to search the internet and your local bookstore for books of licks and patterns. Choose a lick, learn it in different keys, and start playing it over the standards you’re learning—and, eventually, in different positions on the guitar. The more such phrases you assimilate and begin to mix and match, the deeper will become your understanding of jazz mechanics.

Solos

Learn entire solos. If you are up to it, you can transcribe your own. Doing so is a complete jazz workout that will greatly enhance your abilities. The more you transcribe, the better you will get at it.

If you’re not up to transcribing, the internet is full of written solo transcriptions. Take advantage of them. Memorizing whole solos will show you how the pros and legends develop a jazz improvisation and how they navigate chord changes. You don’t need to stick to guitar solos, but they’re a good place to start. Some saxophone, trumpet, and piano solos can be quite hard to adapt to the guitar; however, they’re extremely valuable learning tools.

Play

If you have like-minded friends nearby who love playing jazz, get with them. I spent countless hours jamming with fellow students during my musical studies, and it was probably the most enriching experience I’ve had. Teaming with another guitarist or a bassist is an easy way to start, and you can share ideas and concepts. Playing with horn players will make you work on comping and solo playing, and playing with a pianist will force you to explore a more minimalist direction and creative ways of complementing the music.

* * *

There are many concepts to internalize in jazz. Gather information about them from various sources. Take everything at a steady pace, work your way slowly but surely through what you learn, and you’ll be surprised sooner rather than later at how it all falls into place. Happy practicing!

About the Author

Marc-Andre Seguin is the webmaster, “brains behind,” and teacher at JazzGuitarLessons.net, the number one online resource for learning how to play jazz guitar. He draws from his professional experience both as a jazz guitarist and an instructor to help thousands of people from all around the world learn the craft of jazz guitar.
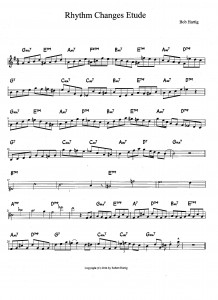
Rhythm Changes: An Etude to Build Jazz Technique

rhythm changes, jazz improvisation, jazz etude 001Here’s a little bop-style etude I created to help build your chops for rhythm changes. No surprises here; I wasn’t striving for cutting-edge ideas but for simple building blocks of jazz vocabulary. Me being an alto sax guy, I’ve written the material in the key of G, which is the alto transposition for the standard “Rhythm” key of Bb. Tenor players, flute players, and so on–sorry for the inconvenience, but you know how to transpose, right? Or just play it as written and hone your facility with the key of G. Click on the image to enlarge it and then have at it. And have fun!

I’ve written in the past about my predilection for rhythm changes as a means of developing a fundamental jazz vocabulary. In their essence, the changes can be construed as simply a succession of turnarounds with a bridge based on the cycle of dominants. You can get as fancy with that as you want to, but the basics are just as simple as the word basic implies.

For more on rhythm changes, click here. I also encourage you to read the point-counterpoint between Kurt Ellenberger and me which evolved out of that post. Whether you love rhythm changes or, like Kurt, hate them, you’ll find food for thought.

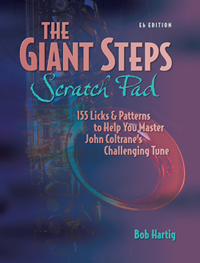
If you enjoyed this post, click here for plenty more articles, exercises, and solo transcriptions. Also, a quick plug for my book The Giant Steps Scratch Pad. If you’d like a practical, hands-on practice companion to help you master “Giant Steps,” well…that’s why I wrote it.

Getting the Feel of a Key

Before I launch into the topic of this post–a quick tip of the hat to Big Band Nouveau for Thursday night’s outstanding performance at The B.O.B. in downtown Grand Rapids. I think this was our best show yet. The guys were simply scorching those charts, and the crowd was hugely responsive. A standing ovation is a pretty good indication that we’re doing something right. Mike Doyle deserves major props for having the vision to pull together some outstanding musicians in a creative effort of such high caliber. Thanks to Mike, and thanks to all the cats. You guys rock to the third order!

With that said, I turn my attention to tonight’s feature: Bb7. Yes, Bb7–or really, the key of Eb major. I just happened to be hashing it out via its dominant chord during my practice session earlier this evening. I’ve been hammering on that key lately because two of my solo numbers in Big Band Nouveau modulate briefly to Eb major, and I want to do more than just get by in those sections. I want to play the crap out of them. And the way to do that is to saturate myself in the key of Eb.

I’ve written previously about key saturation. The idea is to steep yourself in a key in as many ways as you can think of until you know it inside and out. Until you own it. And you own it when you hear it in your head and feel it in your fingers.

Every key has its own feel on the saxophone. Most of us get the feel of certain keys early on. As an alto player, I’m quite comfortable in the keys of D and G, and, to a slightly lesser extent, E and A. I’m also comfortable in C and F, and of course, a number of minor keys. And I can get by decently in all the remaining keys, both major and minor, some moreso than others.

But my fingers know the feel of just a select few keys in a way that I would describe as intimate.

Why is that? After all, there are only twelve tones that a musician has to deal with.

True. But those twelve tones relate to each other in entirely different ways from one key to the next. F# is not just F#.

  • In the key of D, it is the third of the tonic chord.
  • In the key of G, it is the seventh.
  • In B, it is the fifth.
  • In C, it is the augmented fourth; in Eb, it is the sharp two; and in both of these keys, it is a non-diatonic tone.
  • And let’s not forget the obvious: in F#, it is the root.

And that is just how F# relates to the tonic chord. There are six other chords besides in every major scale, not to mention various harmonic formulae, many of which include altered and borrowed chords. And F# has a unique relationship with all of them.

Your fingers feel each of those functions of F# differently, and some functions may be more familiar to your muscle memory than others. Your fingers may, through constant use, know exactly what to do with F# in the key of G, know how to get onto it and off of it from and in every direction and use it in all sorts of creative ways.

But move the key center a tritone to C# and now how familiar are you with that same F#? It has become a completely different animal, and your fingers may not know its feel. The note that you felt utterly at home with in one key can seem like a complete stranger in another. And while it’s true that certain keys get used far more than others, ultimately you want both your fingers and your mind to instinctively know how to treat every one of the twelve notes in the chromatic scale in all twelve major and all twelve minor keys.

The way to achieve that goal is key saturation. I’ve already offered some good suggestions on how to approach the saturation technique in another post, so there’s no need for me to repeat myself here. My point is simply to mention that every key has a feel that is all its own, and it behooves you and me to master all twenty-four of those “feels.”

Yes, it’s a big task. But it’s also a fun one. Just pick a key and work at it. Mine right now is Eb. I find myself focusing especially on the third and seventh of the major chord and the seventh of the dominant chord–G, D, and Ab, respectively. Once I become conversant with those notes in any key, the other notes–both diatonic and non-diatonic–all seem to fall into place.

Okay, enough for tonight. It’s after one o’clock in the morning, and I’m getting sleepy. The rest is up to you.

A Universal Chromatic Lick

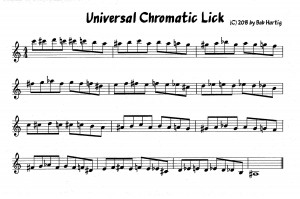
Universal Chromatic LickThe lick shown here will fit in pretty much any harmonic situation (click on it to enlarge it). You can work it as you please, then resolve it on a chord tone and move on.

I like to start it on the flat five of a dominant chord, particularly an altered dominant or a V7b9. The first measure here, for instance, could pair with an F#7b9, and the next measure with an E7b9, and so on, moving downward by whole step with each measure and resolving finally to an F# major chord in the last bar.

You could just as easily maintain an F#7 throughout the entire lick. It will work fine, with dissonances justifying themselves as either leading or passing tones.

The lick also works well with a minor chord, though instead of starting on the flat five, you might try starting on the fourth or fifth. Really, just experiment and decide what you like.

The nice thing about a lick like this is that you can use just fragments of it–a single bar is nice–or you can coast on it for a bit till your brain finds a jump-off point, then launch into a new creative direction.

Have fun with this little device. And if you enjoyed this post, be sure to check out my many other articles on jazz theory, exercises, and solo transcriptions.

Diminished Whole-Tone Lick around the Cycle of Fifths

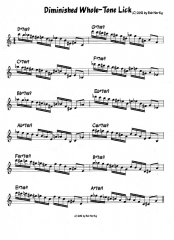
Tonight’s post is low on text but high in content. Click on the image to enlarge it, then print it out and take it with you to your next practice session and start adding a nice new lick to your diminished whole-tone collection.

Not much to say about this little gem that you can’t figure out for yourself, but here are a few points of interest:

    ♦  The lick begins and ends on the flat seventh of the V+7(#9) chord.
    ♦  Beats two and three highlight the major triad that’s formed off of the raised fifth of the parent chord. For example, if you’re playing a D+7(#9), the raised fifth is A#–or Bb, enharmonically–and beats two and three will accentuate an A# (Bb) major triad. You can look at it as chord superimposition.

    ♦  The last beat emphasizes the two “identity tones” of the dominant chord, leaping a tritone from its third to its lowered seventh.

That’s all. Have fun with it! And if you enjoyed this post, check out my large and ever-growing library of jazz theory, technique, and solo transcriptions.

How to Play Chord Changes: Melodicism Versus Change-Running

It was back in my college jazz band days that I first became concerned with “playing the changes”–that is, improvising in a way that insinuated the harmonies of a tune. Prior to that, I didn’t know what changes were. My inner ear had been informed by the blues and the psychedelic, proto-metal, and progressive rock of the seventies–wonderful styles of music, but they didn’t prepare me for the logic and complexities of more traditional harmony or the notations used in jazz charts.

So when our band director, the brilliant Dr. Bruce Early, handed out the first round of charts in my first semester, my freshman mind was fascinated by the lineup of symbols strung across the blowing section of a tune titled “Pygmy Dance.” What did all that mumbo-jumbo mean? An F# followed by a circle with a line slanting through it–what was that? And a B7b9? I recognized B7, but what did b9 mean? It seemed like that might be important for me to know.

Not that I needed to at the time, because I wasn’t playing lead alto. Good thing, too, because the tune was written in 11/8, and I was in no position to do anything with it but follow the rest of the band. When we got to the solo section, the lead guy, Dan Bryska, stood up and blew the balls off of those changes, as he did with pretty much anything I ever heard him play. What the … how did he do that? Amazingly, Dan didn’t even appear to be paying attention to those arcane scratchings on the chart. I’d have been glued to them, but he evidently had internalized them to the point where they appeared to be part of his genetic makeup.

Knowing the Mile Markers

Had I known then what Dan knew, life would have been easier. I’d have instantly recognized the tune as a blues–a long-form blues, as I recall, but still in essence just a blues–and done what Dan did: just stood up and blown. Dan saw the overall form and signposts of the tune while I was trying to figure out its hieroglyphs; Dan saw the tree while I was scrutinizing the leaves. And that knowledge (not to mention Dan’s fantastic technique and musical experience) allowed him to create where I’d have struggled simply to survive.

I soon came to understand the runes of jazz harmony and the scales attached to them. But translating that knowledge into inventive and expressive music was another story. I viewed the written changes as an accountant might, as hard figures which demanded that I justify every note spent, rather than realizing that they were simply guides that suggested certain melodic directions. I still wasn’t ready to do what Dan and other great soloists do: just stand up and blow.

Which brings me to the point of this post: how does one move from the constraints of jazz harmony to freedom and spontaneity?

The question is more relevant for some tunes than others. There’s a big difference between, say, “Cantaloupe Island” and “Confirmation.” The latter, a bebop tune, is far more complex harmonically, and its dense, fast-paced changes are exactly the kind that can hang a player up. But they don’t have to. Here’s why.

Two Approaches to Improvisation

There are two broad approaches to improvising on tunes: change-running and melodicism. In running the changes, a player seeks to outline or imply every chord in every bar, or at least, most of the chords. With a seasoned player, the results can be stunning. But by itself, change-running ultimately is limiting. There’s more to music than glorifying chord tones, and that’s where the melodic approach steps in. Melodic playing concerns itself with creating a pretty or an interesting melody rather than making all the changes. Not that this more scalar approach ignores or disdains a tune’s harmony; it just deals with that harmony more flexibly. As the name implies, it works with scales and melodic lines rather than chord tones.

Most good jazz soloists know how to utilize both approaches. It’s the blend of the two that can take a seemingly tight, demanding harmonic structure and make real music with it.

So here’s the deal: learn the changes to a tune. Work them into your fingers during practice by running arpeggios, patterns, and licks over them. And as you do so, consider whether there are any particular tones that define distinctive measures in the tune, then earmark those pitches mentally. In other words, look for harmonic signposts that you can refer to. You don’t need many of them, just a few, ones that to your ear are the most significant. These will help you get a feel for the broad shape of the tune. The more you work with the tune, the better you’ll get at filling in the areas between those signposts with cool stuff.

The process I’ve just described, which seeks to cultivate both change-running and a broader melodic perspective, requires a good deal of mental effort at the front end, but your playing will become increasingly intuitive as you stick with it. By degrees, the tune will become yours, and you’ll find yourself stepping out of rigidity into exploration and inventiveness.

This holistic approach seeks to balance the extremes at either end. If you’ve been locked into the changes to the point where you’re a change-running machine, maybe you need to lighten up and think more melodically. If you’ve been lax in dealing with the rigors of harmony, think about adding a few more leaves to your tree.

The discipline comes first, then the freedom. Learn how to play the changes, but also know that you’re not enslaved to them. They’re consultants, not employers; guides, not dictators. The better you and your fingers know your way around a tune’s harmonic structure, the more you’ll be able to make judicious choices as an improviser–but don’t get stuck on the chords. The point of learning to serve the harmony is to make it serve you, and you don’t need to be a master change-runner for that to happen. The goal, after all, is simply to play pretty.

So practice hard and practice smart. Then do like Dan: just stand up and blow.

Two Giant Steps Licks

Lately, my book The Giant Steps Scratch Pad has enjoyed a modest spate of sales. I appreciate that musicians take an interest in it. On my part, it was a labor of love, and it’s gratifying when you, my readers, find it worthwhile enough to shell out your hard-earned cash to obtain a copy. Every purchase is a shot of morale for me, not to mention a nice dent in my electric bill.

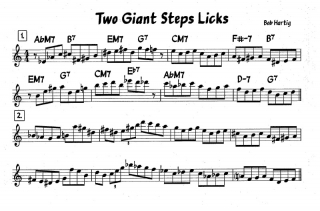
As a way of saying thanks, I thought I’d share with you a couple of favorite new Giant Steps licks that I’ve been practicing. They correspond to the A section of Giant Steps’ A-B form and have a bebop flavor to them.

Since I’m an Eb alto saxophonist, I’ve written the licks out for my instrument. C, Bb, F, and bass clef instruments will need to transpose accordingly. ‘Nuff said. Without further ado, here are the licks. Click on the image to open and enlarge it.

How to Flutter Tongue on the Saxophone

Most days back when I was in elementary school, my friend Pete Rogers brought his submachine gun to school. It was a formidable weapon that Pete employed with withering effectiveness during the war games we boys played at recess, and it possessed the added advantage of instant disassembly into just two components which bore a striking resemblance to Pete’s right and left hands.

As the enemy approached us on the battlefield, Pete would make pistols out of both hands, jam the barrel of one pistol into the other hand behind the base of the thumb, and presto! Instant Tommy gun. “D-D-D-D-D-D-D-DOOOWWWWWW!” Pete would yell, doing a convincing imitation of a kid simulating automatic weapon fire. “D-D-D-D-D-D-D-D-DOOOOOWWWWWWWW!!!” And into the fray he’d charge, he and his handufactured submachine gun. Pete was impressive.

I envied him. Like the rest of the boys, I had to consign myself to plain old bolt-action–until one day, I figured out Pete’s secret for making his machine gun sound. The sound, after all, was the thing. There’s no point in having a machine gun if you can’t fire it. I discovered how.

By placing the tip of my tongue lightly but firmly against the roof of my mouth–not directly behind my teeth, but more toward the center of my palate–and then directing a steady stream of air against it, I could get my tongue to flutter, generating a rattling t-t-t-t-t-t-t-t-t-t sound. Mimicking Pete’s machine gun was then just a matter of adding my vocal chords to the mix.

Now that I was onto Pete’s secret, naturally I customized it to fit my taste. Pete’s sound was loud. I opted for a subtler approach–a Tommy gun with a silencer, if you will. A stealth machine gun. By fluttering my tongue right up against the top of my clenched teeth, and by not using my voice, I managed to produce the coolest, most convincingest machine gun fire you ever heard. It outclassed Pete’s prototype hands down. From then on, my lunch hours were littered with the bodies of scores of enemy soldiers who fell under the subtle but deadly chatter of my .50 caliber finger.

Years later in high school, long after my boyhood war games had ended, I discovered another use for my machine gun sound. By employing it while playing my saxophone, I was able to produce a wild, burry kind of effect. I didn’t realize that what I was doing had an actual name–flutter tonguing–or that R&B saxophonists such as Junior Walker incorporated it as part of their trademark sound. I thought of it as simply an interesting but useless curiosity.

Of course I was wrong. Flutter tonguing can be eminently useful depending on the kind of sound you’re after. I don’t use the technique often, but I can and do pull it out of my pocket occasionally, and so can you whenever you wish. Flutter tonguing is not hard to learn.

Here’s How to Flutter Tongue on the Saxophone

Actually, if you were paying attention, you already know how to flutter tongue. Re-read the fourth paragraph. It describes the basics. Give it a try. No saxophone–just make the machine gun sound (leaving out the vocal part). You want to use my buddy Pete’s approach, not my refinements. Your tongue needs to touch closer to the center of your palate rather than directly behind your teeth.

Once you’re able to produce the rolling, machine-gun-like effect I’m talking about, try it with your horn. Bear two things in in mind:

• You’ll probably need to take in less mouthpiece than you normally would.

• You should not let your tongue touch the reed. Flutter-tonguing isn’t really tonguing in the usual sense; it is not a form of articulation such as single-tonguing or double-tonguing. Rather, your tongue flutters rapidly against the roof of your mouth as you blow into the mouthpiece. If your tongue actually touches the reed, it will choke off the sound.

Flutter tonguing is easiest to use in the middle register of your horn. With practice, you can work your way higher. And with practice, you can also play reasonably in tune. I say this because flutter tonguing can flatten your pitch if you’re not careful. So while the basic effect isn’t particularly difficult to produce, getting it to a point of usefulness may take a bit of work. Overall, though, flutter tonguing is in my experience one of the more easily acquired effects. Compared to mastering double-tonguing or the altissimo register, it’s a cinch.

I may create a video clip of my own to demonstrate the flutter tonguing technique. Meanwhile, this one by Phil Baldino does a great job of letting you see and hear how it’s done.

One for Daddy-O: A Cannonball Adderley Solo Transcription

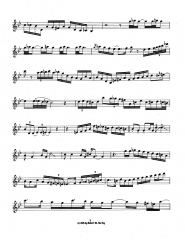
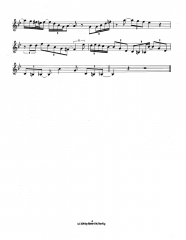
If you’re an alto saxophonist, at some point you’re going to have to go through Cannonball Adderley just as surely as you’ve got to deal with Charlie Parker. Cannon’s buttery tone, prodigious technique, and ability to consistently and flawlessly deliver solos of pristine inventiveness make him a foundation stone of jazz saxophone.

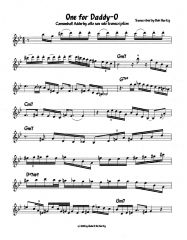
The transcription on this page showcases Cannon playing on “One for Daddy-O,” a Bb minor blues with a head written by his brother, trumpeter Nat Adderley. The feel is a cool, casual shuffle, with no one in any hurry to get

anywhere. Even as Cannon cooks with passion and dexterity for four bars in double-time, he somehow manages to convey a laid-back mood that makes it sound as if he’s lying in a hammock and will return to sipping his iced tea as soon as he’s finished.

“One for Daddy-O” is one of the tunes in the classic Adderley quintet album Something Else. When you give the CD a listen, check out the call-and-response between horns and piano in the head. Points of interest in Cannon’s solo include:
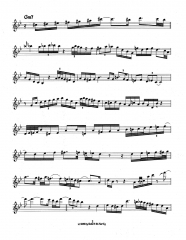
• Use of the G and D Phrygian dominant scales (mode five of the harmonic minor scale)–ex. bar 6, or the fourth bar into the first full 12-bar form; and bars 28 and 36, or the second and tenth bars of the third chorus.

• Rhythmic variety within an overall 16th-note double-time framework. There are places in this solo where you can hear Cannonball stretching the time like taffy, now speeding up, now slowing down, yet never failing to convey a sense of the underlying pulse. The only thing Cannon doesn’t do with time is lose it, even for an instant. It has been a challenge for me to try to capture in notation what he’s doing in some spots!

• Recurrent ideas–motifs, if you wish–that help to unify the solo. The walkdown to low Bb in bar 4 is a good example; you’ll find variations of it reiterated throughout the solo.

But enough of me talking. Time to get on to the solo. Click on the images on this page to enlarge them. And if you’d like to view more solo transcriptions as well as articles, video tutorials, and technical exercises, you’ll find them here.

I should add that I’m still not certain I’ve properly captured the rhythm of the very last two or three bars where Cannon winds things up. If it’s not spot-on, it’s close, and further listening will tell me whether I need to tweak that section or leave it be. Either way, I’ll remove this last paragraph once that final snippet is taken care of.  Everything else checks out. Have fun with it!

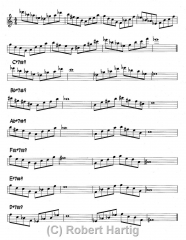
Fourth Patterns with Altered Dominants

This post builds upon a jazz improvisation post I wrote a month ago titled Fourth Patterns: Three Exercises to Build Your Technique. That post gave you some quartal patterns to practice that took you around the cycle of fifths. While I pointed at the harmonic possibilities, I left you to sort them out for yourself. In this post, I’m providing a specific application by applying fourth groupings to altered dominant chords (V+7#9).

Click on the image to your left to enlarge it. The first thing you’ll encounter is a brief exercise that takes you through a fourth pattern moving by whole steps, first down, then back up. It’s a simple exercise. Once you’ve got it down, practice it starting on the note F instead of Eb; you’ll be using the same notes you’ve already practiced, but you’ll reverse the direction of the patterns.

From there, play the same exercise starting on the note E. You’ll now have a different set of notes. Finally, start on the note F#. Once you’ve worked that into your fingers, you’ll have covered all the possibilities.

Moving On to Application

The material you’ve just practiced is designed to help you develop technique specific to the application that follows. Now we’ll move on to that application, as indicated by the chords.

For each chord, you’ll find two groupings of the fourth pattern spaced a major second apart. Together, the two patterns contain the following chord tones: #9, b9, b7, +5, +4*. The patterns are arranged in eighth notes that resolve to a consonant chord tone, thus:

    •  In the first two bars, the b9 resolves to a whole note on the chord root.
    •  In the second two bars, the #9 resolves to a whole note on the major third of the chord.

I’ve written down the applications for six keys. I’m sure you can figure out the remaining six on your own, and you should. Don’t be lazy! You need to become familiar with all twelve chords. Moreover, I encourage you to experiment with variations on these patterns. This exercise will open up your technique for altered dominants–and other harmonic applications–but you should view it as a springboard for further exploration.

As is so often the case, the material I’m sharing comes to you fresh from my own practice sessions. It’s a chronicle of my personal learning curve, and I hope it assists you in yours.

If you found this article helpful, you’ll find many more like it on my Jazz Theory, Technique & Solo Transcriptions sub-page.

Practice hard, practice with focus–and, as always, have fun!

——————————–

* If you add two more tones–the chord root and the major third–you’ll get a complete diminished whole tone scale. In this application exercise, the whole notes use those two missing tones as resolutions.